Showing posts with label projects. Show all posts

Thursday, May 13, 2010

May 13th Already?

From Adriel:

Can you believe that we're almost halfway through the month of May already? Craziness! Time is flying by in some ways, but in others, it seems to be inching by. My due date of June 2nd doesn't seem to be getting any closer... I'm in that stir-crazy phase of pregnancy, trying to keep myself busy and occupied. I know it's not a long wait now, but it still seems so far away and like it's never going to happen. Craziness (in a different sort of way... like mental)!
Anyway, that's a whole lot more than you came to hear today, I'm sure! LOL! I really began this post to show off what we're making today at our project classes today. This cute box w/ 5 note cards.

We're going to be using the Big Shot like crazy today! It should be a lot of fun and I'm looking forward to teaching the class. We'll be seeing some of you later!
And for those of you who are not able to come, but would like the PDF of the directions, I will have that available to purchase later for $3. I want to double-check my directions first for any errors before making it available. =)

Thursday, February 18, 2010

Something Fun to Try

From Adriel:

Here's a different kind of bookmark that is simple to make, but looks awesome! I used the tutorial on Mary's blog which you can find HERE.


I used the Charming stamp set from Stampin' Up! and embossed in black and white. It's really an elegant bookmark and would make a great gift for anyone! Make a card to match, slide the bookmark over the corner and you've got an instant and lovely gift. Seriously, this bookmark takes less than 20 minutes to make... great for when you need a last minute something for a thank you or other occasion and you need a little something more than a card.


Here's another tutorial for a similar, but simpler bookmark made using the Petal Card die. I don't own that die, but this one looks like fun, too!


Have fun and enjoy yourself! We would love to see what you end up with... leave us a link to what you make! =)

Oh, and don't forget about our color challenge... there's still a few more days left. It ends Feb. 26th! Get all the details HERE!

Monday, September 21, 2009

Holiday Gift Tags

From Adriel:

Now it may seem a little early (okay, a LOT early!!) to be thinking about holiday gift tags. You're right, it is. But we have to stay ahead of the game! We've got a holiday gift tag class in November (I think... or is it October?). We try to make our projects ahead of time so we know how many supplies to order and also for pictures and such. In addition, it's wise to make these projects ahead of time so that you can work out all the details and design, blah, blah, blah...With that being said, I worked on the project for our gift tag class. I've been eyeing the cute box with tags in the SU catalog. I found some directions that produce a box that is very similar. I had to tweak the acetate lid a bit, because it didn't fit properly, but I don't remember my changes at the moment. Perhaps I can share those a bit later. =)


All in all, it makes a cute little set. The multi-colored stamped images, however, are not going to be conducive for a class setting. I'm going to have to re-design the actual gift tags that go in this box. But at least I have the box pretty much figured out and the whole set made a cute picture. =)


For more details, read further... =D

You can check out the tutorial for the box and lid HERE at Valerie's blog. As I said, I made some changes to the lid. It was too tight, I thought. I just added a bit more give... easy enough. =)

I made the box out of SU Kraft CS and the acetate I made out of some transparency sheets (had some lying around) that you can buy at an office store. The lovely red ribbon is sadly (sniff, sniff) retired Riding Hood Red Taffeta ribbon from SU with vanilla trim. I'm sure we'll put it to good use for the holidays and miss it immensely when it's gone! =( All of the tags I made are from the SU Hostess set "Christmas Punch" that coordinate with the punches the sell. So cute and easy to create with! =)
Almost forgot to mention that the white "twine" I included with the gift tags is a fine crochet thread that you can find at a local craft store. I've wondered about that myself and read a response somewhere about it and bought some the other day. It does the trick and it's better than embroidery floss... too thick in my opinion. ;-)

Anyway, that's my sharing for the day. I hope you enjoy your Monday and the rest of your week. =)

Thursday, August 13, 2009

It's Thursday Already?!

From Adriel:

Hi to all of you! This week has gone by quickly... it's Thursday already! Has this week gone by fast for you, too? =)

Right now we're a couple hours away from our afternoon card making class! I'm looking forward to making these fun summer cards with our gals. I think they will enjoy making them! =) Here's what we'll be making today!
My mom and I have been working on some fun stuff that I'm looking forward to showing you! We got our new stuff from Stampin' Up! earlier this week... the Build-a-Bear stamp set (so cute and it got us planning a new class!), the Gobble, Gobble stamp and the Autumn DS paper (can't remember the name)... my mom and I spent part of Tuesday evening designing for our Thankful Table class. We were very happy with our results and will share those soon! =)

We were also contacted by our city's Park & Rec. to see if we were interested in doing a nature journal class at a nature park near us. We've got a couple of dates for that class scheduled now and will be working on the design for that soon. Should be fun!

How about you? What's been happening with you this week? Let us know and thanks for stopping by! =)

Monday, March 2, 2009

Spring Tea Bag Book

From Adriel:

My mom made this cute tea bag book the other day! I love the designing she did with it and the special touches that make it "her". Since I took the pictures of it, I'm posting it! =)


This is such a cute way to let a friend know that you're thinking about them! It's great for Easter or just a spring-time "hello".

My mom used a couple of our FREE sale-a-bration rewards that we recently received for this project. The floral stamped image is from the Botanical Blooms set and the patterned paper is the Delicate Dots DSP! Isn't it great?!
I think this kind of project would be great to do for our Stamp Club sometime! =)

BTW, Sale-a-Bration is continuing through the end of March, so there's still time to get these fun products for free! You can find out more about that HERE.

Thursday, February 19, 2009

Stamp Club Today!

Today marks the day of our first Stamp Club meeting! This month's Stamp Club project is this cute and very practical Birthday Calendar. It's great for keeping track of all those birthdays in one place and also gift ideas, PLUS it looks so great!

If you're unfamiliar with how a Stamp Club works, here's a brief explanation:

For 10 months, you agree to spend $25 (each month) in Stampin' Up! merchandise from Heidi (she's the demo). In doing this, you join what we call a "Stamp Club". Following is a list of benefits given to Stamp Club members:

- Stamp Club members receive a FREE copy of the current Idea Book & Catalog, along with other miscellaneous promotional catalogs throughout their 10-month membership!

- Stamp Club members get to come to our club meetings where we make great projects and learn new techniques. There is no extra cost for this! This is an added bonus for joining the Stamp Club. For instance, at this month's club meeting, we will be making birthday calendars. Club members don't have to pay for supplies or anything! They just get to come and have fun and make and create!

- Stamp Club members receive hostess benefits one of the months they are a club member. This doesn't mean you have to "host" anything, rather you simply receive the benefits a hostess would receive from a workshop. You receive the basic hostess benefits, which is a free level 1 hostess reward and $15 in free Stampin' Up! merchandise. You don't have to invite anyone to a workshop or anything! This is just an added bonus you receive for becoming a Stamp Club member. We do offer the option to club members that if they would like to increase their hostess benefits during their month as "hostess", they can "host" their own workshop with friends and collect outside orders, but this is not a requirement.

So, in a nutshell, for $25 a month (for 10 months) Stamp Club members get $25 in Stampin' Up! product a month, along with a FREE monthly project class, FREE catalogs, & FREE Stampin' Up! product (on their month as hostess)!

If you're in or around the area of Chandler, AZ and would like to join us, send us an email to get all the details! We'd love to have you.

Wednesday, January 14, 2009

Valentine Treasures


From Adriel:
Yes, the Valentine Treasures class is today, but you still have time to sign up for Saturday's class! Check the calendar on the right-hand side of the page.


I'm looking forward to teaching this class today and creating with others. Here's a run-down of what we'll be making!

Giftcard Holder


Bookmark
Gift Tag

Cards


Chocolate Box

Remember we still have openings for our Saturday class and there is still time to register!
We would love to have you.

Friday, January 9, 2009

Valentine Treat Jar

From Adriel:

Just giving you another idea on how to use the Love You Much bundle! I love how this turned out!

So simple... used a clear glass jar that we got at Michael's. Made a belly band out of the DS paper (Candy Lane) and cardstock. Wrapped that around the jar, securing it with stick strip. I suppose you could use Snail adhesive or other glue, but this was what came to mind when I was making it! LOL! I wanted it to STAY! Used the coluzzle circle template and cutter to make a nice matching circle for the top of the lid (larger circle out of CS, smaller circle out of DS paper). Stamped the large heart image from the Love You Much set on Riding Hood Red CS and cut it out, attaching it to the top of the jar with dimensionals. Tied some pretty cream-colored satin ribbon around the jar and attached a cute little tag! Put some fun red candies in the jar! How easy was that! So easy, you can do it for someone you know for Valentine's Day! Have fun!


Materials used for this project:
Love You Much stamp set
Curly Labels set
Candy Lane DS paper
Riding Hood Red CS
Pink Pirouette CS
Curly Label punch
Coluzzle Circle Cutter template and blade
Chocolate Chip ink
Riding Hood Red ink
Ivory satin ribbon
Dimensionals
Snail adhesive
Sticky Strip
Hemp cord

Just a reminder, the Love You Much Bundle (which includes the Love You Much stamp set, DS paper & Heart to Heart punch) is only available at 20% off until January 31st!

Tuesday, December 30, 2008

Friend to Friend Card

From Adriel:

Here's another project made with some of the Love You Much bundle!


A 3x3 card with these cute little birds that have been watercolored ever so slightly, just enough so they're not plain.

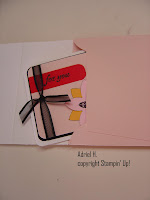
The little red glitter heart was made by using the small heart in the 3-heart stamp from the Love You Much set with Versamark ink, applying heat&stick powder, giving it a blast with the heat gun, pouring on the glitter (can't say sprinkle because I POURED, heehee), another blast with the heat gun... punched out with the corresponding Heart to Heart punch (just the small heart for this one). Love the sparkle!

The sentiment is also from the same set mentioned above. It fit perfectly in the curly label punch so I used that and attached it so that it just peeks out. Just a nice little touch!
This card is part of our Valentine Treasures class on Wednesday, January 14, 2009 & Saturday, January 17, 2009. Class will be held at Heidi's house from Noon - 2:30pm on both dates. Space is limited. We will be sharing more pictures of the other projects that are part of this class as the week goes on.
Thanks for looking! I think I'll make up a few of these little cards and post them on our Etsy shop. They're too cute to keep all to myself! =D

Tuesday, December 9, 2008

Be Mine Box

From Adriel:
Okay, so I showed you the fun paper I made last week using a blank sheet of paper and stamps, sponges and ink. Today, I'm going to show you what I did with some of the paper. This is also a sneak-peek at one of the projects we have planned for our Valentine Treasures project class. We will have more info about dates and times for that later. Here's the cute chocolate nugget box I made using my own paper. Each chocolate is also wrapped with the special paper and stamped to spell out "Be Mine". Hope you like it!

Thursday, November 20, 2008

Christmas Treasures Class

From Adriel:

I know I've shown you these projects before, but I wanted to put them all into one post since they all go together. All these items are part of our Christmas Treasures Project class at Tumbleweed Rec. Center. Christmas Treasures is a 2-week class, on Tuesdays from 12/2-12/9 from 1-4 PM. Registration for this class and others is open and can be done online by visiting HERE.

Altered Chipboard Photo Magnet


Nugget Box w/ chocolates


Stamped Candle


Gift Card Holder

Altered Corkboard


If time permits, we may be able to make a couple of surprises as well! Hope you can make it to this fun class!

(Actual paper and design may vary from examples shown.)

Saturday, September 6, 2008

Time to Vote!

From Adriel:

Head over the Theresa Forseth's blog to vote for your favorite entry for her Handbag Challenge #5. Click here to view the other entries and leave a comment for your favorite! Here's a picture of the handbag for the inspiration and also a picture of what I made! Thanks for looking! Have a wonderful weekend!


Friday, September 5, 2008

Handbag Challenge #5


From Adriel:

It's Friday again and that means the deadline for Handbag Challenge #5 on Theresa Forseth's blog is fast approaching. My entry this week is 4 little 3x3 cards and special "bag" to hold them in. I found a wonderful tutorial for an envelope book here. I used the same concept and designed my own "envelope" that would hold 3x3 cards and envies. I decorated the front of the card holder to match the purse as best I could. The colors I used for this "handbag" were Blush Blossom, Pink Piroutte, Summer Sun, Real Red, Whisper White, and Basic Black (SU! colors).

The bag opens to hold 4 matching 3x3 cards and envelopes. You can see how it opens below.


I tried a new technique with this project... faux metal. The silver accent on the front of the bag is actually 3 layers of silver embossing powder imprinted with a stamp. So cool! I was stumped on the zipper, so I consulted my mom (who sews very well BTW). She got out a zipper and rubbed ink on it and rubbed that on paper. It seemed promising, so we rubbed Versamark on the zipper, rubbed on the CS, then applied the silver embossing powder which was then heat embossed. It worked great!


The card is a 3x3 card with the same colors used on the purse. I used the Fresh Cuts set for the saying and and the flower in the middle of the flower. I used my 5-petal punch for the embellishment and some nice, sheer, black ribbon. It would make a cute gift for someone, I think.


The bag was the most difficult part of the project. It took a lot of planning and working, along with re-working. I've been working on it a little here and a lot there over the past 3 days! It was worth it and I enjoyed what I learned. It really looks so much nicer in person, but I've posted several pictures to give you some good views. Thanks for looking and enjoy your weekend! Don't forget to go to Theresa's blog on Saturday and Sunday to vote for your favorite entry!

Tuesday, September 2, 2008

A Fun Party Favor!

From Adriel:
Hi there! I hope you all enjoyed your long weekend. We enjoyed ours with our family and friends. We got the ping-pong table out and had some fun with that. My dad spend this weekend building a wall craft storage thingy in the craft room at my parents' house. It looks so nice! I will have to put a picture of what he did on here when I get a chance. He did a great job and it will make the creating process so much easier with everything nicely organized and at our fingertips. So a BIG thank you to my dad!


Onto the subject of my post... a fun party favor! These little things are apparently called "Sour Cream Containers". Click here for the tutorial on SCS. I've wanted to try this out for awhile and had some time last week. These were fairly simple and quick to make. My kids wanted to make one, too, so I helped them put theirs together and they decorated them afterwards. Jacob gave his to Daddy and it got opened and thrown away before we got a picture. Here's mine and Kayla's. Kayla did a cute job decorating hers. Anyway, it was a fun project and one that the kids enjoyed making also.


All this is in preparation for the classes we will doing at Tumbleweed Rec Center during the winter through Parks & Rec for Chandler. We'll be doing a party favor class where we will be teaching participants how to make all kinds of different party favors. It should be a lot of fun!

Thanks for stopping by and looking! Have a great day!

Wednesday, August 20, 2008

Hey!

From Adriel:

Hi there! I keep putting off taking pictures of some of the stuff we've been working on! Last Friday we did a 5 for $5 class, and the cards turned out so cute! I will post pics of them soon! Yesterday I did a candle! Yes! That was pretty exciting! You can stamp on candles and it is so easy to do and the results are wonderful! Anyway, I will share a picture of that soon also. My mom was working on a gate-fold card yesterday along with a cool sponging technique. I like how her card turned out! So, a whole bunch of new stuff and no pictures! However, I mentioned a week or two ago some of the projects that were in the making. One of them was this altered lunch box tin. What do you think? I think I'm going to embellish it a little to give it more character, but I thought I would share this picture anyway. I don't know if I would use it for carrying my lunch around, but it is a perfect size for keeping cards in!

Also, we're getting the September newsletter ready to send out soon, so be looking for that in a few days. If you have provided us with your email address, you will more than likely be receiving the newsletter via email this month. This helps us save a little money and also keeps your paper mail clutter down. If you prefer to receive a hard copy of our newsletter via snail mail, please let us know!

I was encouraged by this verse today: "Rejoice in the Lord always; again I will say, rejoice!" Philippians 4:4

Thursday, August 7, 2008

Birthday Calendar

From Adriel:

Mom showed you all her birthday calendar a few days ago. Now it's my turn!

I mentioned a couple of weeks ago that we went on a little trip up to a cabin. My mom brought along the supplies to make this fun project. So we spent one afternoon working on these and put the finishing touches on them when we got back. They were a lot of fun to make and I love the results!

I used a lot of different materials for this project. First of all, this whole thing started out as just a plain old file folder! After folding it this way and that, it was all ready to decorate! I first inked all the edges of the folder... I didn't really like the light yellow look of the file folder with my paper. I cut my DS paper to size and inked all those edges, too. Then I attached all my paper. I used rubons, chipboard, brads, ribbon, sticky tape, stamps... I'm sure I forgot something! Anyway, it was fun to make! Thanks for looking!