Saturday, October 29, 2011

Scalloped Faux Metal Gratitude


This is the last card we made in my Fall-Themed class this month. This features the MDS digital medallion stamp from Day of Gratitude, so I guess it qualifies as a hybrid card.We used water coloring to color in the medallion and we made our own Faux Metal textured metal paper for the background paper and button. This was a lot of fun to create and share with all of my stamping gals. They all did such a great job!
  • Here's a mini tutorial for the Faux Metal technique:
Supplies: Aluminum Foil, cardstock, glue stick, textured impression folder
Use glue stick to glue aluminum foil to cardstock. Apply glue stick liberally.
Place aluminum foil over cardstock and use bone folder to make sure that you get a good adhesion between the foil and cardstock. I chose the burnished aluminum side versus the shiny side for my Faux Metal piece.
Cut out your Faux Metal shape of choice using a punch or by placing your foil/cardstock piece face down on the Big Shot die. I chose the Scallops #2 die, large scallop.
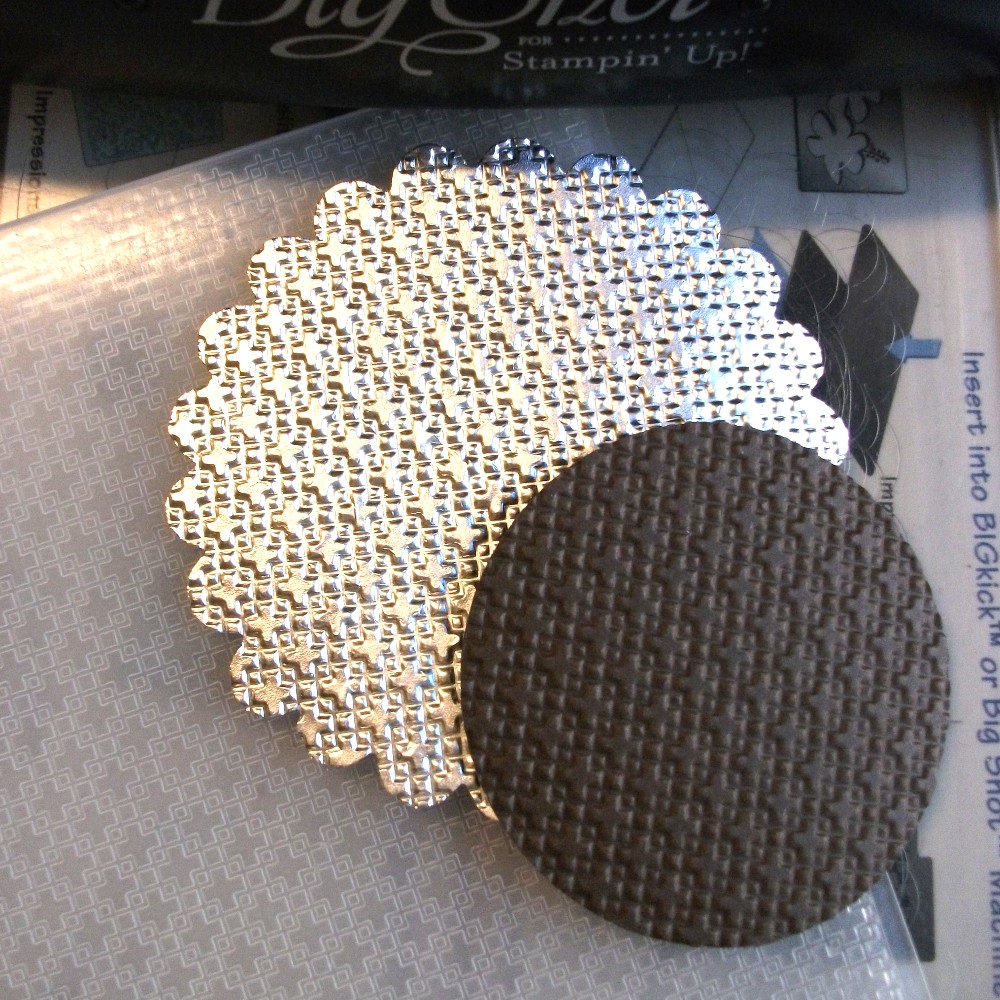
Place your Faux Metal shape into a textured impression embossing folder and run through Big Shot.Voila!  You have yourself a very cool looking metal shape. For extra interest, add some alcohol inks to color and distress your Faux Metal shape.

Thanks for stopping by!
Supplies:
Cardstock: Whisper White, Early Espresso
DSP: Spice Cake
Ink: Early Espresso; Reinkers - More Mustard, Pool Party
Punches: 2-1/2" Circle
Big Shot: Scallop Circle, Scallop Circle #2 Bigz die, Square Latticke folders
Stamp Set: MDS Day of Gratitude, Teeny Tiny Wishes

Wednesday, October 26, 2011

Autumn Pocket Silhouette


This is another card that we made in my Fall-Themed class this month. We used the Baby Wipe Technique to stamp the bouquet from  the Pocket Silhouette stamp set. I used the Designer Frame folder to emboss and create an oval frame for the stamped bouquet.
  • Here's a mini tutorial for the Baby Wipe Technique:
(Supplies: Reinkers, baby wipe, stamp set of choice, cardstock)
Randomly squeeze a few drops of Reinkers (More Mustard, Old Olive, Soft Suede) on folded baby wipe to create your own stamp pad. I placed Soft Suede and Old Olive reinker drops towards bottom and added More Mustard and Old Olive towards the top of my Baby Wipe stamp pad.
Place stamp of choice in Baby Wipe stamp pad (I used one of the Pocket Silhouette's) and stamp on center of Whisper White or Very Vanilla cardstock.
Have a wonderful day!

Supplies:
Cardstock: More Mustard, Very Vanilla, Early Espresso
DSP: Spice Cake
Ink: Early Espresso, Soft Suede ink pads; Reinkers - More Mustard, Old Olive, Soft Suede
Punches: Wide Oval, Word Window
Big Shot: Ovals #2 Bigz die, Framed Tulips and Designer Frames folders
Stamp Set: Pocket Silhouette, Teeny Tiny Wishes

Friday, October 21, 2011

Free Day of Gratitude Tutorial

My theme for this month's card class was Fall. The Spice Cake DSP made designing easy with its great color combinations and designs.
The first card I'm sharing is a hybrid, combining digital and card making. I used the MDS Autumn Kit digital download for the Day of Gratitude sentiment and the French Foliage leaf. I enlarged both the digital Day of Gratitude and French Foliage stamp, printing them out on Whisper White cardstock.The Spice Cake DSP background is also a digital printout. If you'd like to make this card for yourself, please Click Here for my FREE step-by-step tutorial, which includes the digital information for this card, along with instructions for putting the card together.
Thanks for dropping by and have fun!

Wednesday, October 19, 2011

Letters to Santa Gift Holder Kits and Tutorial

We're getting close to that time of year...gift-giving time! Last month I shared these fun Letters to Santa Gift Card-Money-Coupon Holders (whew...that's a mouthful!) in my classes and I'm excited to offer them here to you in a PDF tutorial. I also have a few pre-cut kits available for purchase below. 

This class tutorial features two Gift-Giving Holders using Big Shot die-cuts, punching, stamping and a digital coupon. Both holders use the Letters From Santa DSP. The Double-pocket Christmas themed gift card holder uses the stamp set Word Play and includes a ribbon belt and buckle closure. The Holiday or Birthday themed Coupon-Gift Card booklet uses the stamp set Bring on the Cake and includes a digital fill-in-the-blank PDF coupon. I've also included a couple of generic PDF sentiments for both of the holders. I give you detailed step-by-step 18-page illustrated instructions with pictures and cutting guide. The cost for the Letters to Santa Gift-Giving tutorial is $5 and can be purchased below by clicking on the "Buy Now" button. The PDF tutorial will be emailed to you within 24 hours.

Letters to Santa PDF Tutorial - $5.00


As I mentioned above, I have a few Letters to Santa Gift-Giving Class Kits available for $15 (+ $5 Shipping/Handling). Each Kit includes the following: 
  • Prepared Kit includes all pre-cut punched, textured and die-cut cardstock pieces, pre-cut Letters to Santa DSP. The  Kit comes ready for you to stamp and assemble. (Stamp sets not included - use your own stamps or purchase the featured stamp sets at a $5 discount through me. A couple of punched generic sentiment print-outs are included).
  • Ribbon, Brads, Eyelets, as shown on projects.
  • 18-page PDF Illustrated Tutorial with photographs and step-by-step instructions
  • PDF Digital Coupon and extra digital images
 Please Note: You will need to provide adhesive, ink and stamp sets to complete the project as shown in picture.
Ink: 119668 - Marina Mist; 119670 - Early Espresso; 119784 - Pear Pizzazz; 121030 - Crumb Cake; 119786 - Blushing Bride; 103133 - Real Red (all ink pads 5.95)
Stamp Set: 120651 - Word Play  (28.95); 121958 - Bring on the Cake (27.95) (please contact me for $5 discount)
Accessories: Blender Pen - 102845 (9.95)

Letters to Santa Kit - $15.00 + $5.00 shipping (Mailed Tuesday and Friday)

Friday, October 14, 2011

A Pocket Silhouette Thank You

This is a beautiful card that Adriel created recently. The clean and simple design looks great with the stamped stems from the Pocket Silhouette stamp set. I love the color combination she used, too - Marina Mist, Night of Navy, Pear Pizzazz. She used the Elegant Lines textured impression folder to emboss the Marina Mist.

Tuesday, October 11, 2011

Bread Sleeve

A couple of years ago Adriel and I were making these mini bread sleeves for our Etsy store and selling them. These little bread sleeves make the cutest way to give away your little Holiday loaves of bread.


Here are the dimensions, if anyone else would like to make some for the holidays. These fit a 3x5 mini bread loaf.

SUPPLIES: 4.25x11 cardstock, decorative paper, sticky strip or adhesive
1 - Starting at one of the long ends, score at 7/8", 2-1/4", 4-1/4", 6-3/4", 8-3/4", 10-1/8"
2 - Fold at scores to form a box except for the scores at 7/8" and 10-1/8", fold those in the opposite direction to form a handle, as seen in the picture.
3 - Glue decorative paper strips to sides, if desired.
4 - Glue or sticky strip the 7/8" handles together.
5- Punch a hole in the middle of the handle and tie a ribbon or add a decorative tag.
6 - Insert your wrapped bread loaf! Very easy!
I made a large loaf of bread to give to some friends and thought that I'd create a larger bread sleeve using retired DSP colors and stamp set, which I've posted a picture of here.
These go together quickly and are sure to get you a "Wow!"
Thanks so much for taking time to stop by and visit. I appreciate it :-)