Showing posts with label 3x3 card. Show all posts

Monday, April 19, 2010

Sweet & Simple Monday: 3x3 Kraft Note Cards

These cards feature some DSP and colors that are no longer current, but you can easily take the dimensions and the idea and swap out the retired DSP and colors for current DSP and colors for the same simple and charming effect. Kraft (which will be renamed "Crumb Cake" in the new Stampin' Up! catalog coming out July 1st) is so versatile and will go with almost anything. I used this DSP paper because we had some sitting around. Use whatever you've got! =)

1. Fold a 3" x 6" piece of Kraft CS in half to form a 3" x 3" note card. Round bottom corners w/ corner rounder.

2. Attach a 1/2" x 3" strip of DSP toward bottom of card front with SNAIL, approximately 1/4" from bottom edge. Attach a 1-1/4" x 3" strip of DSP directly above first DSP strip with SNAIL.

3. Stamp floral image from Priceless stamp set with coordinating inks, depending on DSP you use. Punch out stamped image with 1-1/4" circle punch.

4. Punch a 1-3/8" circle out of a piece of cardstock in a coordinating color. Punch a 1-1/2" circle out of a piece of cardstock in a different coordinating color. Layer these circles with SNAIL, attaching stamped circle in center.

5. Attach the layered circle piece to card front w/ dimensionals toward upper right-hand corner.

Sometimes a simple scrap or stamped image can give birth to a sweet and simple design. I love how these cards look and they're one of the simplest cards I've ever made!

Thanks for stopping by our blog today. We hope you enjoyed the sweet and simple project. Leave us a comment if you like or show us some of your own sweet and simple projects you've been working on.

Have a wonderful day! =)

You can order all your Stampin' Up! supplies from Heidi by clicking HERE!
Supplies: Kraft CS, Stampin' Up! DSP, Classic inks or Stampin' Write markers, Priceless stamp set, corner rounder, SNAIL adhesive, Stampin' Dimensionals.

Thursday, February 4, 2010

Pink Valentine

From Heidi...I was inspired by a card Sara Spencer created, then with the "You and Moi" stampset...coupled with the new Sweet Pea DSP, how can you not make a cute card? Thanks for looking!

Monday, January 18, 2010

Something Different...

From Adriel:

I know we've been showing a lot of Valentine-ish cards and things... that's just what we've been making recently! =) But I have something a little different to show you today and so let's get to it!

We have a wonderful park nearby us called the Veteran's Oasis Park that has a small lake where you can fish and nature trails and such. They have an education center facility also, with a little gift shop inside. We have a nature journal class planned there in February and May (I think!), but they were interested in selling some of our cards with a nature theme in their gift shop. So we made up some samples and let them have a look over them... blah, blah, blah...

My mom made some beautiful cards, but I don't have any pictures of those (YET)! Here's just a couple that I made in the cute 3"x3" note card that I love for something quick!


I'll try to get some pictures taken of my mom's cards, because she made most of the samples and her cards are really nice! Have a great Monday and enjoy your day! =)

Tuesday, January 12, 2010

Mini Love Notes

From Adriel:

I love making 3x3 mini note cards... they're just so cute! Of course, you can't send them in the mail (unless you put them in an A2 envelope), but they're perfect for giving along with a small gift, or tucking somewhere to find later, or just for giving from hand to hand on their own! Anyway, they're cute... that's the important part! And they're also pretty easy to make a bunch of because of the size... cute and simple! I really like that! =D


I used small squares of the lovely new DSP from Stampin' Up! called Sending Love Specialty DSP. Each sheet of DSP has one side that has glitter on it... built in glam!! ;-)

Simple, yes. Quick... well, cutting those squares super small and then adhering them evenly on... not so quick. But CUTE... remember, that is what we're going for! =D

Look for these in our Etsy shop soon!

Monday, June 8, 2009

Shabby Flower Tutorial

From Adriel:

This tutorial is featured in our newsletter this month. I wanted to share it on our blog as well! I saw the original idea for this on a YouTube video that you can view HERE if you like. But if you'd like step-by-step written directions, here you go!

Supplies:
1 - 3”x3” piece of card stock
2 - 3”x3” pieces of designer series paper
Scallop Circle punch
Rhinestone brad
Tombow Multi-Purpose Adhesive
Small silk flower (or paper flower)
Scissors
Paper piercer (not shown in supply photo)


Step 1: Punch out a scallop circle out of each piece of DS paper and card stock.


Step 2: On the two DS paper scallop circles cut a slit at each scallop.


Step 3: Crumple the DS paper scallop circles in hand until desired look is achieved. Scallop circles should be nice and crumpled. The more crumpled, the more “shabby” the flower will look.


Step 4: Use adhesive to attached scallop circles one on top of the other, starting with the card stock on the bottom.


Step 5: Pierce the center of the flower with a paper piercer or a needle.


Step 6: Put the silk flower in middle of flower and attach the rhinestone brad through the middle, through all the layers of the flower. Flower is now completed and ready to use on a project.


Here's some gift tags that I showed you guys last week that I made using the shabby flowers... TONS of fun, right?!?! I sold these tags this weekend at a vendor fair we did over the weekend. I ended up stringing thin black ribbon with white polka dots through them. Didn't get a picture of them with the ribbon before they sold, but they were even more fun with the ribbon added! I ended up using smaller paper flowers instead of the silk flower and used a button in the middle instead of a rhinestone brad.

Hope you enjoyed looking! Try the tutorial out and see if it's easy to follow or not. Let me know! =D

Wednesday, April 1, 2009

Spring 3x3 Cards

From Adriel:

Another day... wait a minute! It's Wednesday and that means it's the middle of the week! (I'm just being random and weird, so just act like this is normal!) LOL! =D

I'm making yummy French Dip Sandwiches for dinner tonight using my mom's famous recipe (at least it is in our family). "Why do I want to know this?" you ask... well, you probably don't care, but I'm looking forward to it and wanted to share! Hey, that rhymed!! Did you notice that?

Okay, okay, I'll stop! I really should stop. Let's get back to what we usually do here...

I used the retired set "Drawing on Nature" for these cute 3x3 note cards. I stamped them in chocolate chip ink and then used pastels to color in some of the image. The pastels really worked well on these cards, as they added a very soft touch of color that went well with the style of the cards.

I also distressed all the edges by using the sponging technique along with Sahara Sand ink... it's a great color for distressing. I think I mentioned that previously!! LOL! =) Well, it is... so that's why I'm saying it again!
The bunny cards are sold out in our Etsy shop, but the butterfly cards are still available. Do you like how I bolded and enlarged the key words there? I thought I would make it easy for you to find out the status of these cards!! =) heehee You can find the butterfly note cards HERE.


Well, I suppose it's time to end this rather unusual post. If I continue, it may result in more random weirdness... so, I will end by saying...

Thank you so much for coming by and checking out what we're up to. Also, thanks for your comments! It makes blogging so rewarding! Have a great day, everyone! =)

Sunday, March 8, 2009

Little Easter Cards

From Heidi...
Here's some little 3x3 Easter notecards I made last week. I used the "Live Like You Mean It" and "All Holidays" stamp sets; CS - Kiwi Kiss, Perfect Plum, Barely Banana; Ink - Pale Plum, Certainly Celery, and Perfect Plum; Punches - Scallop Edge, Boho Blossom, 1-3/8" square punch; Ribbon, brad and paper piercing. Enjoy!

Saturday, February 21, 2009

Fun Tangerine Note Cards

From Adriel:


Winter is almost over and here in Arizona it's not really hard to imagine spring... it already feels like spring. Besides, winter this year was only like a week long (at least it felt that way)! So, as we are nearing the end of February, these cards seemed happy and "spring-y".


Again, I used some white textured CS, which I'm really liking! It's adds some, ahem!, texture to a project! I just stuck with simple for these cards and I liked how they turned out. They are 3x3 cards (I really like that size!) and I actually didn't use any dimensionals on this card! GASP!! I can't remember the last time that happened! But it just goes to show that you don't always need dimension, but some interest definitely. I chose to cut up the sentiment into strips to add more interest. I also added a couple of small rhinestones and a bit of stitching. The Tangerine Tango CS is a bit on the dark side, so I added Whisper White CS inside for writing on.
Recipe:
Friendship Blooms (Retired Sale-a-Bration set from last year)
Tangerine Tango CS
White Textured CS
Bashful Blue CS
Whisper White CS
Tangerine Tango ink
Night of Navy ink
Tombow Glue (for the rhinestones and sentiment strips)
Sewing machine

Friday, January 16, 2009

Blue Love Notes

From Adriel:
Here's some love notes I made the other day. Thought I would share them with you!

These are 3x3 cards, which is a great size for a love note! 3x3 cards are a favorite shape of mine, partly because of their shape (square), but also because they're easy to make and you can get 3 card bases out of 1 sheet of 8.5" x 11" cardstock, so they're cheaper, and we all like that, right!?! Okay, here's what I used:

Baja Breeze CS
Very Vanilla CS
Pink Pirouette CS

Versa Mark
Baja Breeze ink
Pink Pirouette ink
Sparkly Gold embossing powder

All Holidays set
Priceless set

Heart to Heart punch
1-3/8" square punch
dimensionals
adhesive

Lots of fun to make! I especially liked the gold embossing powder, so much that I made two other sets of the same layout with different colors and more gold embossing powder! Thanks for looking. Have a wonderful day!

Wednesday, January 14, 2009

Valentine Treasures


From Adriel:
Yes, the Valentine Treasures class is today, but you still have time to sign up for Saturday's class! Check the calendar on the right-hand side of the page.


I'm looking forward to teaching this class today and creating with others. Here's a run-down of what we'll be making!

Giftcard Holder


Bookmark
Gift Tag

Cards


Chocolate Box

Remember we still have openings for our Saturday class and there is still time to register!
We would love to have you.

Tuesday, December 30, 2008

Friend to Friend Card

From Adriel:

Here's another project made with some of the Love You Much bundle!


A 3x3 card with these cute little birds that have been watercolored ever so slightly, just enough so they're not plain.

The little red glitter heart was made by using the small heart in the 3-heart stamp from the Love You Much set with Versamark ink, applying heat&stick powder, giving it a blast with the heat gun, pouring on the glitter (can't say sprinkle because I POURED, heehee), another blast with the heat gun... punched out with the corresponding Heart to Heart punch (just the small heart for this one). Love the sparkle!

The sentiment is also from the same set mentioned above. It fit perfectly in the curly label punch so I used that and attached it so that it just peeks out. Just a nice little touch!
This card is part of our Valentine Treasures class on Wednesday, January 14, 2009 & Saturday, January 17, 2009. Class will be held at Heidi's house from Noon - 2:30pm on both dates. Space is limited. We will be sharing more pictures of the other projects that are part of this class as the week goes on.
Thanks for looking! I think I'll make up a few of these little cards and post them on our Etsy shop. They're too cute to keep all to myself! =D

Tuesday, December 23, 2008

Look What My Mom Made!!!!

From Adriel:

Can you say "Wow!"? This handmade box that my mom made is just stunning, along with the matching cards! She really did a beautiful job and I wanted to show off her work on here! Good job, Mom!

Wednesday, December 3, 2008

Pacific Point 3x3


From Adriel:

Some of you may recognize this card from several weeks ago. We got together with a group of ladies at Carol's house to make 5 cards. We made 2 of this design.


This card is a 3x3 notecard. It's a great for giving with gifts or just a friendly note to someone! Below is the recipe for the card:

Pacific Point CS, Whisper White CS, Kiwi Kiss CS, One of a Kind set, Seeing Spots set, Pacific Point classic ink, Kiwi Kiss classic ink, scallop circle punch, 3/4" circle punch, dimensionals, mini glue dots, & rhinestones.

Stamping in different colors on white cardstock is a great way to make your own custom paper that coordinates perfectly with your color scheme and design.

Thanks for looking!

Wednesday, October 29, 2008

Circle Cards

From Adriel:

Here's some cute cards I made using a coluzzle circle and blade and the cute (but retired) set, Very Punny.


Here's a close up of one of the cards.


I made four sets of these cards to sell at the craft shows. They fit into a 3x3 envelope. I water colored the images with a blender pen and inks. I used my crimper on the background circle to add some texture to the cards and topped off all the cards with ribbon! I think they're pretty cute! What do you think?

Supply list (all SU! unless noted):

Gable Green CS
Lovely Lilac CS
Barely Banana CS
White CS
Chocolate Chip ink
Gable Green ink
Lovely Lilac ink
Barely Banana ink
White craft ink
Very Punny set (retired)
Sprinkles set
Itty Bitty Backgrounds set
Ribbon (all ribbon used is not SU!)
Crimper
Blender pen
Coluzzle circle template and blade
2" circle punch (not SU!)
Scallop circle punch
1-3/8" circle punch
Dimensionals


Also, I added a new picture of my mom and I to our side bar. It was taken last Thanksgiving. Just makes me thankful for my mom. She's a very good friend. :-D

Friday, September 5, 2008

Handbag Challenge #5


From Adriel:

It's Friday again and that means the deadline for Handbag Challenge #5 on Theresa Forseth's blog is fast approaching. My entry this week is 4 little 3x3 cards and special "bag" to hold them in. I found a wonderful tutorial for an envelope book here. I used the same concept and designed my own "envelope" that would hold 3x3 cards and envies. I decorated the front of the card holder to match the purse as best I could. The colors I used for this "handbag" were Blush Blossom, Pink Piroutte, Summer Sun, Real Red, Whisper White, and Basic Black (SU! colors).

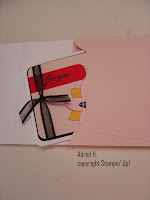
The bag opens to hold 4 matching 3x3 cards and envelopes. You can see how it opens below.


I tried a new technique with this project... faux metal. The silver accent on the front of the bag is actually 3 layers of silver embossing powder imprinted with a stamp. So cool! I was stumped on the zipper, so I consulted my mom (who sews very well BTW). She got out a zipper and rubbed ink on it and rubbed that on paper. It seemed promising, so we rubbed Versamark on the zipper, rubbed on the CS, then applied the silver embossing powder which was then heat embossed. It worked great!


The card is a 3x3 card with the same colors used on the purse. I used the Fresh Cuts set for the saying and and the flower in the middle of the flower. I used my 5-petal punch for the embellishment and some nice, sheer, black ribbon. It would make a cute gift for someone, I think.


The bag was the most difficult part of the project. It took a lot of planning and working, along with re-working. I've been working on it a little here and a lot there over the past 3 days! It was worth it and I enjoyed what I learned. It really looks so much nicer in person, but I've posted several pictures to give you some good views. Thanks for looking and enjoy your weekend! Don't forget to go to Theresa's blog on Saturday and Sunday to vote for your favorite entry!