I've posted our May Newsletter and this month's Craftroom "How-To" video that coincides with our newsletter. This month's Craft Room share is how to make a Perfect Bow and Bowmaker . Be sure to check out both the Craft Room tutorial and video below. The Newsletter includes all of this month's classes for this month with descriptions, pictures, time, dates and registration information.
The theme for this month's Card Class is Fancy Folds, with a Secret Message Gatefold card, a beautiful Scallop Easel, and a fun Get Well card. The Project Class for this month is for all the scrappers out there. which is a Vintage Tag Scrapbook with little surprises tucked in here and there. I'll be adding a How-To video for the Secret Message Gatefold card later this month, so be sure to check back to view it. Thanks so much for stopping by!

Saturday, April 30, 2011
Wednesday, April 27, 2011
Another Graduation Card How-To


Supplies:
Cardstock - (5-1/4x10-1/2") Bravo Burgundy; (3-3/8x3-3/8" - front panel) (2x2-1/2"-stamp/punch piece) More Mustard; (3x4" punch piece) Basic Black; (3x3") Whisper White
Big Shot - Square Lattice texture impression folder
Punches: Star; 3/4" circle; 2-1/2" circle Hand punch
Stamp Set -Take a Spin
Ink - Cherry Cobbler; Basic Black Stampin' Write marker
Accessories - Game spinner hands, Cutter/Scorer, Ruler, 56" black embroidery floss, dimensionals, SNAIL adhesive, Sticky Strip
 |
| 1. Create the Spring Card as shown HERE. Ink up Take a Spin stamp with Cherry Cobbler. Use Basic Black marker and color in all the outer circle "Happy's". Give stamp a few "huff's" with your breath and stamp image on 3x3 Whisper White CS. Punch out stamped image using the 2-1/2" circle punch. |
 |
| 2. Punch out 4 black stars. Run 3-3/8" square More Mustard through Big Shot using the Square Lattice textured impression folder. Snail textured More Mustard square to the front of Bravo Burgundy card. Snail 3 of the Basic Black stars at the top and 2 side corners. |
 |
| 3. Punch a 3/4" More Mustard circle and snail to center of stamped Whisper White image. Snail the 4th Basic Black star to center of stamped image. |
 |
| 4. Make a tassle as shown HERE, in Step 13. Punch a hole in the center of stamped circle image and attach the brad through the game spinner hand, thread brad through the top loop of black tassle, then add the washer, fastening brad ends to the back of stamped circle. Dimensional stamped Whisper White circle to center of card front. |
Monday, April 25, 2011
Graduation Card Tutorial
A couple of years ago Adriel came up with the idea to use the Spring Card as a graduation cap. You can see her card HERE. This year we have several friends who are graduating, so we are in need of some graduation cards. I thought it would be fun to revisit our Graduation Card and make up some for this year's grads. I've posted the tutorial for the Graduation Card below...Have fun!


Supplies:
Cardstock - (5-1/4x10-1/2") (3x4" punch piece) Rich Razzleberry; (3-3/8x3-3/8" - front panel) (2x2-1/2"-stamp/punch piece) Whisper White
Big Shot - Finial Press texture impression folder
Punches: Scallop Trim Corner, Boho Blossom, Itty Bitty, Large Oval, Hand punch
Stamp Set -Silhouette Sentiments
Ink - Old Olive, Soft Suede
Accessories - Jewels (Pearls), Rhinestone brad, Cutter/Scorer, Ruler, 56" black embroidery floss, dimensionals, SNAIL adhesive, Sticky Strip
 |
| 1. Fold Rich Razzleberry CS in half lengthwise. |
 |
| 2. Fold right side of CS to the center fold. Fold will be 2-5/8" from right side of CS. |
 |
| 3. Turn CS over, face down. Bring the lower left hand corner up and over the CS until the lower edge is even with the 2-5/8" foldline. |
 |
| 4. Open up CS, Bring the top left hand corner down and over s o that the upper edge is even with the 2-5/8" foldline. |
 |
| When CS is opened up the Spring Card foldlines appear. |
 |
| 5. Mark center of left side of CS (2-5/8") |
 |
| 6. Cut from center point down to the foldline on each side to create a point at the top of the card. |
 |
| Backside of card |
 |
| 6. Fold CS at foldlines and add a 1" piece of Sticky Strip to underside point of Spring Card. |
 |
| 7. Press point with Sticky Strip down upon card base. |
 | ||||||||||
| 8. Finished Spring Card...time to decorate! |
 |
| 9. Punch all 4 corners of 3-3/8" Whisper White CS square. Place Whisper White CS in Finial Press texture impression folder and run through Big Shot. |
 |
| 10. Stamp Whisper White stamp/punch piece with Congrats (Soft Suede) and floral stem (Old Olive). Punch stamped Whisper White CS with large oval. Punches: Boho Blossom - (1 Rich Razzleberry small flower); Itty Bitty - (1 Rich Razzleberry scallop) |
 |
| 11. Punch Boho Blossom- (1 large Rich Razzleberry flower) |
 |
| 12. Form a note pocket: Use one of the triangles cut from the side of the card in Step 6 and SNAIL the side edges to the backside of Spring Card to form the pocket. Cut a piece of Whisper White CS to create the note insert. |


 |
| 13. Create Tassle - Fold 42" length of black embroidery floss into 3" sections. You should end up with 7 folds at the top. With 12" piece of black embroidery floss, create and tie a slipknot through the 7 folds, this will be the top of the tassle. Starting from the top of the tassle, begin winding one of the 12" ends around the top section of the tassle, working your way down about 1/2". Wrap around one more time, this time forming a loop so that you can thread the end of the floss through the loop to tie a knot. Trim ends of tassle to desired length. |
 |
| 14. Snail Rich Razzleberry small Boho Blossom and Itty Bitty scallops together. Snail to stamped/punch Whisper White oval, at end of Old Olive stamped stem. Snail Rich Razzleberry large Boho Blossom to center of Whisper White textured front panel. Dimensional stamped oval to upper section of Whisper White front panel, just under the top punched corner. Punch a hole through center of large Razzleberry flower. Add a rhinestone brad through the top loop of black tassle and center of Razzleberry flower. Dimensional Whisper White front panel to Rich Razzleberry card front. Add a small pearl to center of Boho and Itty Bitty flowers on stamped oval. |
Saturday, April 23, 2011
Springtime Vintage Four Frames
I hope that you're all enjoying your weekend. My husband is redoing our closet, which means that everything from my closet is my bedroom...Yikes! My question is... how did all the stuff that's laying all over my bedroom fit into my closet?

Since he's busy building, etc., I thought that I'd squeeze in a little bit of creative time to make some birthday cards. Here's the one I made today using the Build-A-Blossom stampset and Blossom Petal punch, Springtime Vintage DSP, the new Four Frames stampset and new Decorative Label punch. Since I love texture, I used my textured impressions folders (Perfect Polka Dots, Framed Tulips for a row of EB'ing, Square Lattice), and I even threw in the crimper on the Rose Red petals. I used clear EB on the DSP petals then did some sponging to accent the unembossed parts. I just had some fun.


Since he's busy building, etc., I thought that I'd squeeze in a little bit of creative time to make some birthday cards. Here's the one I made today using the Build-A-Blossom stampset and Blossom Petal punch, Springtime Vintage DSP, the new Four Frames stampset and new Decorative Label punch. Since I love texture, I used my textured impressions folders (Perfect Polka Dots, Framed Tulips for a row of EB'ing, Square Lattice), and I even threw in the crimper on the Rose Red petals. I used clear EB on the DSP petals then did some sponging to accent the unembossed parts. I just had some fun.
I hope that you all have a Happy Easter!
"He is not here, for He has risen, just as He said..." - Matthew 28:6

Supplies:
Cardstock: Soft Suede, Rose Red, Whisper White, Early Espresso
DSP: Springtime Vintage
Ink: Soft Suede, Rose Red
Stamp Set: Build-A-Blossom, Four Frames, Messages for Mom
Punches: Decorative Label, Blossoms Petal, Itty Bitty (scallop), 3/4" circle, Corner Rounder
Big Shot:Textured Impression folders - Perfect Polka Dots, Framed Tulips, Square Lattice
Accessories: Crimper, Jewels - Pearls, Rose Red grosgrain ribbon (cut and frayed), Clear EB powder, Heatgun, Sticky Strip, dimensionals, Snail adhesiveWednesday, April 20, 2011
Butterfly Punched Sweet Peas
The first time I saw these beautiful punched Sweet Peas was on Judy Marshall's blog, when one of my stamping friends sent me a link to it. Aren't these gorgeous?
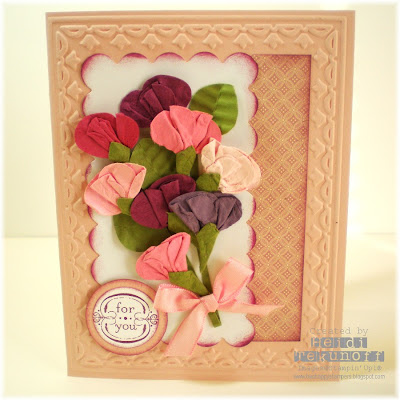 The theme for this April's card class is Spring and Floral which I centered around these great flowers. If you'd like to try these Sweet Peas out for yourself, I've posted a technique video tutorial here.
The PDF tutorial for April's Spring and Floral class is available below. The techniques used on this month's card are masking, paper manipulation, and marker to stamp. Thanks again for stopping by :-)
 Spring and Floral Class PDF
This class includes step-by-step instructions, detailed material and cutting instructions, and lots of How-To photos. The cost of the PDF class (which includes directions for all 3 cards) is $3.95 and can be purchased below by clicking on the "Buy Now" button. The PDF will be emailed to you within 24 hours.

The PDF tutorial for April's Spring and Floral class is available below. The techniques used on this month's card are masking, paper manipulation, and marker to stamp. Thanks again for stopping by :-)

This class includes step-by-step instructions, detailed material and cutting instructions, and lots of How-To photos. The cost of the PDF class (which includes directions for all 3 cards) is $3.95 and can be purchased below by clicking on the "Buy Now" button. The PDF will be emailed to you within 24 hours.
Tuesday, April 19, 2011
Elegant Thank You
I love the color combination of Marina Mist and Early Espresso. Couple this color combo with the punched hydrangea from the "Because I Care" stampset and you have the makings of a very elegant card. I can toot the horn on this card because I didn't design it :-) This is another card that Adriel created for our April Spring and Floral class.
 Thanks so much for visiting!

Monday, April 18, 2011
Sponge and Masking
I thought I'd share this beautiful card that Adriel designed for our April Spring and Floral class. I love the cut-out hyrdrangea...so elegant!
 I hope that you're having a great start to your week!

Friday, April 15, 2011
Acetate Class Part 3 Video and Tutorial
As promised, here's my Acetate Class Part 3 video. This little card below uses the techniques in Video 3, and is a lot of fun to make, as you get to stamp and then color in the stamped image with markers...fun, fun, fun!

I am offering the PDF for this class, which includes 2 cards and 2 cute embellishments. The PDF includes a thorough and detailed list of supplies and dimensions along with step-by-step directions and photographs to give you written and visual instruction. In addition, I have 3 free technique videos that feature the technique how-to's for this class. You can view the first video HERE, which is Acetate Class Part 1, Part 2 HERE, and today's Part 3 video. It's the next best thing to stamping with us!
 The cost of the PDF class (which includes directions for all 3 projects) is $3.95 and can be purchased below by clicking on the "Buy Now" button. The PDF will be emailed to you within 24 hours.
Acetate Technique Class PDF

I am offering the PDF for this class, which includes 2 cards and 2 cute embellishments. The PDF includes a thorough and detailed list of supplies and dimensions along with step-by-step directions and photographs to give you written and visual instruction. In addition, I have 3 free technique videos that feature the technique how-to's for this class. You can view the first video HERE, which is Acetate Class Part 1, Part 2 HERE, and today's Part 3 video. It's the next best thing to stamping with us!

Acetate Technique Class PDF
Tuesday, April 12, 2011
Elegant Soiree Celebrate
I'm teaching my Floral and Spring classes today at Tumbleweed Recreation Center. My morning class was fun and I'm looking forward to tonight's class. It's been several weeks since I've stamped with the "gals", so it will be fun to get caught up with everyone and maybe meet a newbie or two...that's always fun!

Today's share is a birthday card I made. I used the Elegant Soiree DSP, the Square Lattice textured impression folder and circles.
 Thanks for stopping by...I hope you have a great day!

Today's share is a birthday card I made. I used the Elegant Soiree DSP, the Square Lattice textured impression folder and circles.

Supplies:
Cardstock: Soft Suede,Crumb Cake, River Rock, Baja Breeze, Early Espresso
DSP: Elegant Soiree
Ink: Chocolate Chip
Stamp Set: Something to Celebrate (Hostess)
Accessories: dimensionals, Snail adhesiveSunday, April 10, 2011
Inkspiration Challenge and Free PDF and Video Tutorials
Wow, my blog heading was quite a mouthful! I hope that you're all having a wonderful day so far.
 I'm excited to share this week's Inkspiration Challenge card that I made. To back up a little bit, last month we visited my in-laws. (I have one of the sweetest mother-in-laws, honestly!) While we were there she showed me an apron I'd made her. It must have been a LONG time ago because the only memory I had of the apron was the fabric, no memory of sewing it for her. She asked me to make her another one because the one she showed me was wearing out.
 What a treat to have her ask me for something! She has everything. So since I'm teaching my granddaughter, Kayla, to sew, we picked out some fabric and trim and started sewing on it last week. What a fun project to do together. I wanted to make her a card to go with the apron, so this week's Inkspiration Challenge got me going...I incorporated the apron fabric and eyelet trim to the card, so that it will coordinate with the apron, and since one of the Acetate Embellishments I made in last month's Acetate Class used the same colors as the fabric, it all worked together nicely.
 To top it off, I created a Free PDF tutorial for the card which I'm excited to share with all of you. Just CLICK HERE and it will take you to the FREE PDF tutorial. Plus, I've posted a video tutorial below showing you how to use the White Stazon and Stampin' Up pastels on acetate.
I am also offering the PDF for the Acetate Class, which includes the 2 cards and these 2 cute embellishments shown below. The PDF includes a thorough and detailed list of supplies and dimensions along with step-by-step directions and lots of photographs to give you written and visual instruction. In addition, I have 3 free technique videos that feature the technique how-to's for this class. You can view the first video HERE, which is Acetate Class Part 1. Today's video is Acetate Class Part 2, I'll post Part 3 on April 15 (Tax Day, BTW!). It's the next best thing to stamping with us! Thanks so much for stopping by. I hope you enjoy the video and the free tutorial!.

The cost of the PDF class (which includes directions for all 3 projects) is $3.95 and can be purchased below by clicking on the "Buy Now" button. The PDF will be emailed to you within 24 hours.
Acetate Technique Class PDF
Friday, April 8, 2011
April Spring Floral Classes
I'm excited to share this month's classes which is Spring and Floral themed, plus I get to see all my stamping friends again. We've got Sweet Peas and Hydrangeas planned, along with fun techniques to create the cards below at next week's Tumbleweed Recreation Center Classes on Tuesday, 4/12 (312TW.331 - 10 AM and 313TW.331 - 7 PM).
 I'll also be offering this class the following Tuesday, 4/19 at my house. If you'd like to join any of the classes, visit the link above for Tumbleweed or just email me. I'd love to have you join us!

Tuesday, April 5, 2011
Grab Bag Special

So far, many people have taken advantage of this offer--so many in fact that the $15 grab bags are already sold out. In order to keep a $15 option available, Stampin' Up! is now combining the $10 and $5 grab bag to fulfill $15 grab bag orders. The value of the products you will receive is unchanged.
Each bag will contain a variety of discontinued products that could include a combination of any of the following: ribbons, Accents & Elements, chipboard, Designer Series Papers, and Simply Sent kit components. Grab bags will not contain stamp sets or tools.
Please keep these tips in mind:- Grab bag orders can only be placed on-line. Click for my on-line Stampin' Up! store.
- There is no minimum purchase required to participate in the grab bag special offer.
- There is no limit to the number of grab bags a customer may purchase; however, grab bag items are only available while supplies last.
- All grab bag sales are final. There are no refunds or exchanges.
- Not all grab bags will be unique.
TO ORDER, click for My On-line Shopping Store and look for "CLEARANCE RACK" on the left. Be sure to click "ALL" in the "SHOW" drop down box on the right so you see everything!!!
Monday, April 4, 2011
Acetate Card Class PDF and Video Available
Have you ever wished you could take one of our classes and create with us, but you can't make it to one of our classes because of time or distance? Well, we've got some exciting news for you!
 Today's video, Part 1, shows how to stamp on acetate using White Stazon, which I used on the card below.

We are offering the PDF for our Acetate Technique Class that we taught last month, which includes 2 cards and 2 embellishments. The PDF includes a thorough and detailed list of supplies and dimensions along with step-by-step directions and photographs to give you written and visual instruction. In addition, we have 3 free technique videos that feature the how-to's for this class. We've posted the first video below, which is Acetate Class Part 1. The Acetate Class Parts 2 and 3 videos will be posted over the next few weeks. It's the next best thing to stamping with us!
The cost of the PDF class (which includes directions for all 3 projects) is $3.95 and can be purchased below by clicking on the "Buy Now" button. The PDF will be emailed to you within 24 hours.
Acetate Technique Class PDF
Friday, April 1, 2011
April Newsletter and Craft Room Video
It's time for our April Newsletter and this month's fun "How-To" video that coincides with our newsletter's Craft Room How-To. This month's Craft Room share is how to make the Accordion Rosette, which Adriel made. This Rosette makes a wonderful focal point for a card or paper project, so be sure to check it out both the Craft Room tutorial and video below. We've included all our upcoming classes for this month with descriptions, pictures, time, dates and registration information.
The theme for this month's Card Class is Spring and Floral, with a beautiful Sweet Pea Bouquet, Masking, and Paper Piecing. And I'm super excited about this month's Project Class, which is a Cupcake-Themed Gift Box, Cupcake, and Pull-Out card. My wonderful husband (who is a graphic designer), created a PDF Cupcake template for me...thanks so much, Phil! I can't wait to share it with all of you. Plus, I'll be adding a How-To video for the Sweet Pea's later this month. So be sure to check back throughout the month. Without anymore ado...enjoy the video!
Thanks for visiting! I hope that you all have a wonderful day!
Subscribe to:
Posts (Atom)