Showing posts with label hybrid cards. Show all posts

Saturday, June 22, 2013

MDS Lovely As a Tree

(there's too many fun promos to list them all here)

Today's card was created using My Digital Studio after I was inspired by a layout in a paper catalog I received. I thought the Lovely As a Tree digital stamp would work out well for this sympathy card.
 I lightly water colored Soft Suede over parts of the digital stamp to create shadowing. I also used the Simply Scored tool and paper piercing to give the card a handmade touch.

Thanks so much for stopping by and visiting!

Supplies:
CS: Very Vanilla, Marina Mist
INK: Digital Soft Suede and Early Espresso
SS: Digital Lovely as a Tree
ACCESSORIES: Simply Scored Tool (122334), Essentials Paper-Piercing Pack (126187)


Thursday, April 18, 2013

Bright, Bold Hybrid Birthday


(there's too many fun promos to list them all here)

I case'd this card from SU's Bday Under Construction digital kit (which I love, BTW). I used My Digital Studio to create the More Mustard background and to create the "happy birthday" embellishment, cutting it out, adding a brad to one of the stars and dimensionalling it onto the front of card. Fast, easy, and cute!
Thanks so much for stopping by!

Thursday, March 14, 2013

Hybrid Melon Mambo Birthday

CLICK HERE TO VIEW STAMPIN' UP'S PROMOTIONS
(there's too many fun promos to list here)


This birthday card was created using My Digital Studio. I used SAB's digital version of Madison Avenue and Vintage Verses stamp sets on a Melon Mambo digital DSP background and ran that through the Big Shot using the Square Lattice embossing folder for texture. I punched out Melon Mambo Itty Bitty Shapes and added them to the digital images... and what's a card without a little bit of "bling"?

Thanks for stopping by!


Thursday, May 24, 2012

Hybrid Masculine Celebrate


This card was a lot of fun to make. I think this is the first pennant banner card I've made. I've had the Petite Pennants Builder punch for awhile, but hadn't gotten around to creating a card with it until recently.
I created several of the card parts using My Digital Studio and then printed them out and built my card. I created and printed the digital DSP using the Write Stuff II. The digital "Celebrate" sentiment is from the 2012 Sale-A-Bration CD's Outlined Occasions digital stamp.
One of the benefits of My Digital Studio is that none of my digital purchases end up getting retired...everything is always current. Love that!

Thanks for visiting!

Thursday, May 17, 2012

Hybrid Masculine Sail Away

I don't know about you, but I'm usually short on masculine cards. I have tons of florals and pastels, etc. So this month I focused on creating some "manly" cards. Last week I shared the fun punched wrench card and tutorial, which was inspired by Chris Twing. Today I'm sharing a more nautical themed card using the direct-to-paper technique, along with My Digital Studio's digital stamp "Sail Away". (As a side note, Stampin' Up is offering a 30-day free trial of My Digital Studio Express, if you'd like to try out digital stamping or hybrid cardmaking.) 
I used the Stripes embossing folder and Cherry Cobbler baker's twine to add a bit of interest.  
So glad that you stopped by!

Friday, December 23, 2011

A Very Simple Christmas Card

Since I haven't posted any cards for awhile, I thought I'd share this simple Christmas card I made. These were my "send out" cards this year. I used mostly digital images from My Digital Studio. I did stamp a nice sentiment inside each card using the Petite Pairs. My hybrid additions are the crimped Early Espresso band across the front, the colored star rhinestones and a tied bow.

They were fast, easy but still handmade.. my kind of card.
...and like the card says, "Have yourself a Merry little Christmas"!

Saturday, October 29, 2011

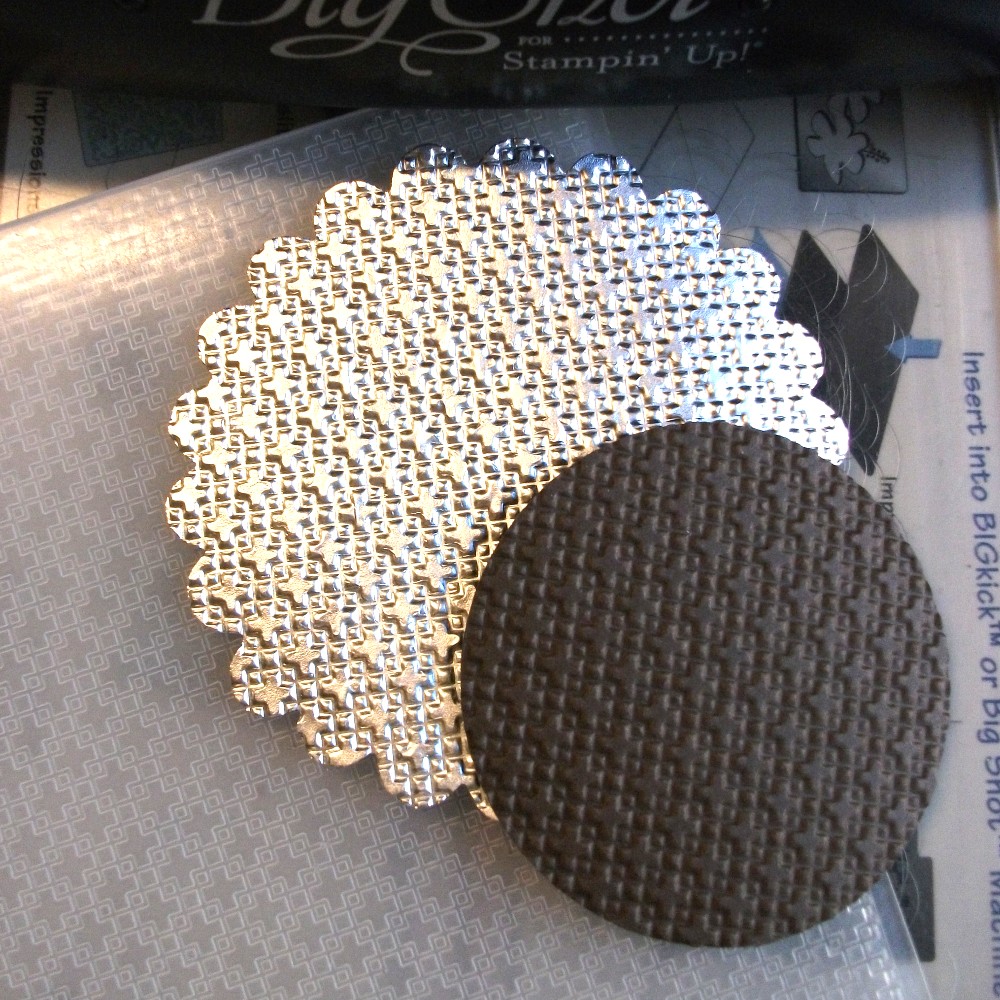
Scalloped Faux Metal Gratitude


This is the last card we made in my Fall-Themed class this month. This features the MDS digital medallion stamp from Day of Gratitude, so I guess it qualifies as a hybrid card.We used water coloring to color in the medallion and we made our own Faux Metal textured metal paper for the background paper and button. This was a lot of fun to create and share with all of my stamping gals. They all did such a great job!
  • Here's a mini tutorial for the Faux Metal technique:
Supplies: Aluminum Foil, cardstock, glue stick, textured impression folder
Use glue stick to glue aluminum foil to cardstock. Apply glue stick liberally.
Place aluminum foil over cardstock and use bone folder to make sure that you get a good adhesion between the foil and cardstock. I chose the burnished aluminum side versus the shiny side for my Faux Metal piece.
Cut out your Faux Metal shape of choice using a punch or by placing your foil/cardstock piece face down on the Big Shot die. I chose the Scallops #2 die, large scallop.
Place your Faux Metal shape into a textured impression embossing folder and run through Big Shot.Voila!  You have yourself a very cool looking metal shape. For extra interest, add some alcohol inks to color and distress your Faux Metal shape.

Thanks for stopping by!
Supplies:
Cardstock: Whisper White, Early Espresso
DSP: Spice Cake
Ink: Early Espresso; Reinkers - More Mustard, Pool Party
Punches: 2-1/2" Circle
Big Shot: Scallop Circle, Scallop Circle #2 Bigz die, Square Latticke folders
Stamp Set: MDS Day of Gratitude, Teeny Tiny Wishes

Friday, October 21, 2011

Free Day of Gratitude Tutorial

My theme for this month's card class was Fall. The Spice Cake DSP made designing easy with its great color combinations and designs.
The first card I'm sharing is a hybrid, combining digital and card making. I used the MDS Autumn Kit digital download for the Day of Gratitude sentiment and the French Foliage leaf. I enlarged both the digital Day of Gratitude and French Foliage stamp, printing them out on Whisper White cardstock.The Spice Cake DSP background is also a digital printout. If you'd like to make this card for yourself, please Click Here for my FREE step-by-step tutorial, which includes the digital information for this card, along with instructions for putting the card together.
Thanks for dropping by and have fun!

Sunday, May 22, 2011

Fabulous Florets Thank You How-To

 This beautiful floral image is from the new Summer Mini's Fabulous Florets. This time around, I decided to purchase the My Digital Studio's digital Fabulous Floret download, instead of the actual stamp set and I've enjoyed the versatility of the digital set.
I needed some quick "Thank You" cards, but I wanted them to be special, so I went hybrid. I love how they turned out and wanted to share a very quick "how-to" here with you.
One of the things that I like about digital stamping, is that I can make my images larger or smaller, which is what I did here. I used the Fabulous Floret's large floral image, colored it Not Quite Navy, and placed it in the bottom left corner. I resized the first floral image to make two slightly smaller florals and placed them on either side of the corner floral, and and then made one last resizing to the first floral, making it slightly smaller, and placed it in the upper right corner. I inserted the leaf image, chose Old Olive as the color, and then made a mirror image and placed the leaves in between the three floral images. My background is Barely Banana. I saved my image as a jpeg and then opened up Word, inserting my Fabulous Floret jpeg into my document, resized it to 3-3/4x5, copied it and pasted it three more times onto my 8-1/2x11 screen page. Then I printed it out on Whisper White cardstock. Voila! Now I have a beautiful stamped background that I can use over and over with the click of a button...What a time saver!
I went with a digital sentiment, as well. Here I chose MDS Thank You Kindly stamp set. I created a new MDS Project using the 8-1/2x11 page option. I then chose my "Thank You"stamp from the Thank You Kindly stamp set, colored it Early Espresso, sized it so that I could create a 3/4"x3-1/2" sentiment strip with it. (You gotta love the resizing feature.) I positioned the sentiment at the top left of the screen page, allowing space for trimming it to 3/4"x3-1/2", copy and pasted it onto the top right of the screen page again allowing for my desired finished dimensions, copied both sentiments and pasted them down the page and used MDS to print them out. Again a time saver :-)
CARDSTOCK: Not Quite Navy (5-1/2x8-1/2, folded in half for cardbase); Old Olive (3-7/8x5-1/8, Front panel); Fabulous Floret digital background printed on Whisper White (3-3/4x5, digital panel); Printed Thank You sentiment on Whisper White (3/4x3-1/2); So Saffron, Old Olive, Not Quite Navy (Punch Pieces)  PUNCHES: 1-1/8" Circle punch - punch left side of Whisper White Thank You sentiment; Photo Corner - Punch right side of Whisper White Thank You sentiment to flag end; Blossom Bouquet, set at far right - So Saffron, use the inside punched flower; Boho Blossom, small flower - Old Olive; Itty Bitty, scallop - Not Quite Navy; INK: Old Olive, sponge outer edges of punched So Saffron flower and the centers of Old Olive leaves on digital background.


1. Snail Fabulous Floret digital background to Old Olive front panel, leaving even borders around all sides. Snail panel assembly to Not Quite Navy card front, leaving even borders around all sides. 2. Dimensional Whisper White Thank You sentiment to the left front of card, with bottom of sentiment about 1-1/8" from bottom of card. 3. Assemble flower by snailing Old Olive flower to center of So Saffron flower. Snail Not Quite Navy flower to center of flower assembly. Attach Old Olive brad to the center of flower and dimensional flower to left side of sentiment and card front.

Pretty easy, huh? And the best part, is that if you need more cards, you can just print out the card parts, punch a few pieces of cardstock, and within a few minutes you have yourself some beautiful cards.

Also, Stampin' Up! is offering a My Digital Studio Express-Downloadable Version for $39.95, which is the full My Digital Studio software, but with minimal digital content. It's an affordable option allowing you to pick and choose which downloads you need and want. Thanks for stopping by!

Wednesday, September 29, 2010

Another Thanksgiving Post

From Heidi...

This is a hybrid card I created for one of our upcoming classes...I've used digital stamped leaves along with a hand stamped sentiment and then built the card like I would a hand stamped card. The leaf is one of the digital stamp sets included in My Digital Studio. I am finding myself using MDS more and more...not only for convenience sake, but it allows new avenues of creativity, as well. I shared this program last night at a workshop I hosted...It was fun to share the digital fun with others.
This card is one that we'll be making in our October 5 Tumbleweed class. If you'd like to sign up, visit the City of Chandler's Park and Recreation site to register. (319TW.130 - 10AM-Noon class; 320TW.130 - 7-9 PM class)

Tuesday, June 29, 2010

A Hybrid Thank You

From Heidi...
Isn't it nice to have a post from Adriel? Wow, and a one-handed post at that, complete with pictures. I love your color challenge card, BTW, Adriel!With my son's graduation and his 18th birthday he received quite a few gifts and cards, so he was in need of some "thank you's." This is when I love My Digital Studio. It is a time-saver when it comes to making cards. You're able to create that handcrafted card look and yet it's SO much faster and let's face it, sometimes you just need some fast cards to send out. These are the "thank you's" I made for him. Thanks for stopping by and I hope that you're having a nice afternoon!

Monday, June 14, 2010

Another My Digital Studio Hybrid Card

From Heidi...This Hybrid Card is my favorite of the three that I made. I love the colors in this watercolor image and the tall vertical feel. I used My Digital Studio's digital Summertime Splendor DSP. The more I'm using MDS, the more I'm seeing all of the possibilities with this program. The ability to resize the downloads make it super versatile, because you're not limited to one size stamp or one sized image on the DSP. I'm looking forward to our Hybrid Classes next month. I can't wait to share the cards with everyone.Adriel bought herself a copy of MDS with some of her birthday money, so when she's got a little more time to play with it, I'm looking forward to seeing what she comes up with. She's usually is a little braver than I am when it comes to the technical stuff.
Cardstock: Cajun Craze, Bashful Blue, Early Espresso, Very Vanilla
Ink: Basic Black, Chocolate Chip (sponging)
Punches: Photo Corner, Itty Bitty Shapes
My Digital Studio, Linen thread, Button

Saturday, June 12, 2010

My Digital Studio Hybrid Card

From Heidi...
I've been designing and creating the last few weeks, so now I have some new cards and projects to share with you. I've been creating for a Hybrid Class we'll be offering next month. I used My Digital Studio's new Summertime Splendor download DSP paper to create the focal point of this card. Stampin' Up's new core color, Cherry Cobbler, really sets the watercolor image off. I just got my order with the new colors a few days ago, so it's been fun to play with the new DSP and stampsets. I also received the new 2010-2011 Idea and Catalog book...it's full of new and fun stuff to create with. Thanks for stopping by and visiting us!


Cardstock: Pink Pirouette, Cherry Cobbler, Rose Red
Ink: Basic Black
Big Shot: Perfect Polka Dots Impression Folder
Punches: Scallop Trim Border, Modern Label, Word Window
My Digital Studio - Summertime Splendor DSP; Black grosgrain ribbon; pink button

Friday, May 21, 2010

New My Digital Studio Download

From Heidi...Stampin' Up! just came out with a new My Digital Studio download called Summertime Splendor and I am in love with this paper. The watercolor flowers on the front of this card are one of the digital images...this digital DSP is beautiful! My dad was a watercolorist who painted beautiful landscapes and waterfront images...so I think it's pretty cool to be able to print up a beautiful watercolor image, stamp a sentiment on it and put together this hybrid card in a matter of minutesTo create this card I opened MDS, and chose the square punch. I resized it to create a 3-1/2" square and filled it with the Summertime Splendor digital paper, printed it out, trimmed...stamped sentiment in basic black, and put the card together...in less than 15 minutes!I love stamping and I also love digital creating, as well. The combination of the 2 creates fun hybrid cards. I am looking forward to playing around with this new digital paper and coming up with some hybrid cards. Stay tuned for a hybrid card class in the near future!