Showing posts with label free tutorial. Show all posts

Sunday, June 23, 2013

Open House Tutorial

(there's too many fun promos to list them all here)

Yesterday I held my annual New Catalog Workshop for my stamping gals. I was going to take pictures of the day, but in all the hustle and bustle I completely forgot! I emailed one of the ladies that the Catalog Workshop is a little crazy (how could it not be with 23 of us stamping at the same time!), but always a lot of fun. The ladies that stamp with me are the part that make up the fun. Thank you to everyone who came! Sure was a fun day :-)
I'm sharing the two cards that we made along with a FREE illustrated tutorial for the card that I designed. If you'd like to access the PDF tutorial for the butterfly card above CLICK HERE, or through my Free Tutorial page.
I found and CASE'd the second card from Vicki at stampsmiles.com. How can you improve on her card design? It's perfect for showcasing the new in-colors and Mosaic Madness stamp set.

Have a great day!


Tuesday, November 20, 2012

Merry Gift Card Ornament

Today I'm sharing this fun ornament along with a FREE TUTORIAL, if you'd like to make them for yourself. I got the idea for these cute ornaments from another blogger, who got her idea from Martha Stewart. From there I thought that if they were redesigned, they would make great gift card holders that you could hang on your tree. I went ahead and remade them to hold a gift card, but they could be used as a money holder, or what we're actually going to be using them for...our "wishlists". We're using the gift card holder inserts to write our wishlists on and tucking them back into the Ornament. Each Ornament has the name of one member of the family which has their wishlist. It puts a fun little spin on Christmas this year.
I made simple embellishments for the ornaments using stamping and My Digital Studio, but they could be made up as extravagant and as fun as you like. All supplies, cutting and assembly information can be found in the tutorial.


I saw another really cute idea today for a 25 Days of Christmas garland. If I find time to make one up before December 1, I'll post it on my blog for you.
Have a Happy Thanksgiving!!

Thursday, October 4, 2012

Mixed Bunch Smooches Card and Tutorial

I'm excited to share this fun card with you because I also have a FREE tutorial to go with it. We made this card in my September card class. It uses the Rock-n-Roll stamping technique to get the darker color around the edges of the flower petals of the cute stamp set Mixed Bunch.
CLICK HERE to access the free tutorial.
Have fun creating!


Thursday, July 5, 2012

Summer Smooches Notecard Box Tutorial

 Today I'm sharing this fun Summer Smooches Note Card Box along with a free tutorial for you. This boxed note card set would also make a nice holder to tuck a gift card into. It  features the Summer Smooches DSP, the Mixed Bunch stamp set, and a fun Rock and Roll stamping technique. Have Fun!!


Thursday, June 28, 2012

In-Color Card Tutorial


Today I'm sharing a card we made at my New Catalog Workshop a few weeks ago.

 If you'd like to make the card or would like the supply list, you can Click Here for the free PDF tutorial and supply list. I love all the fun colors together...hope that you have a great day!
Thanks for stopping by :-)

Thursday, May 10, 2012

Tool Time Tutorial

My theme for this month's card class is masculine with a bunch of other fun techniques thrown into the mix. I chose punch-art for one of the cards and used these punch-art wrenches for the focal point. This makes a perfect Father's Day or Fix-It guy's birthday card. Chris Twing gets credit for the cute wrench idea. When I saw them I couldn't wait to try them out for myself. If you'd like to make these for yourself, I've posted a How-To tutorial below. They're easy and a lot of fun to make!

Supplies:
Punches: Itty Bitty - scallop (118309), 1-1/4" Circle (119861), 3/4" Circle (119873), Word Window (119857), Handheld punch (101227)
Cardstock: Basic Gray (2) 1/2x2" - Wrench Handles; 2x5-1/2" punch piece for wrench parts
Ink: Basic Gray
Additional Supplies: 2-way glue pen (100425), Sponge dauber (102892), Silver brads (104336)

Punching:
  • Word Window -  Punch 2 slits in (2x5-1/2) Basic Gray punch piece, about 1-1/2” apart.
  • 1-1/4” circle - Center circle punch over one of the slits, leaving an even thickness around the sides and bottom of slit and punch. Repeat for the second slit. This creates the wrench head.
  • Itty Bitty Scallop - Punch 2 scallops in remaining Basic Gray punch piece about ¾” apart.
  • ¾” circle - Center circle punch over one of the Itty Bitty punched scallops, leaving an even thickness around the scallop and punch. Repeat for the second scallop.This creates the Wrench bottom.

Sponging:
  • Basic Gray Ink –   Sponge around edges of wrench pieces: handle, wrench head, wrench bottom.  (Disregard stamped sentiment)
Assembling:
  • Snail wrench heads to one end of wrench handles.
  • Snail wrench bottoms to the other end of wrench handles.

  • Overlap and glue wrench handles as you like and add a couple of silver brads.

Click Here to visit the rest of My Crafty Picks this week

Tuesday, November 8, 2011

Free Faux Metal Card Tutorial

 I love this Faux Metal technique. I have a bunch of ideas I'd love to use this technique out on. Now, whether or not I end up with time or not to try out my ideas, well... I'll just have to see how it goes.
This was one of the cards we made last month for my Faux Metal Class. The Spice Cake DSP lends itself to metal accents...what a fun set of paper it is to play with. If you'd like to make this card yourself here's the link to my FREE tutorial. Have fun with it!

Wednesday, October 26, 2011

Autumn Pocket Silhouette


This is another card that we made in my Fall-Themed class this month. We used the Baby Wipe Technique to stamp the bouquet from  the Pocket Silhouette stamp set. I used the Designer Frame folder to emboss and create an oval frame for the stamped bouquet.
  • Here's a mini tutorial for the Baby Wipe Technique:
(Supplies: Reinkers, baby wipe, stamp set of choice, cardstock)
Randomly squeeze a few drops of Reinkers (More Mustard, Old Olive, Soft Suede) on folded baby wipe to create your own stamp pad. I placed Soft Suede and Old Olive reinker drops towards bottom and added More Mustard and Old Olive towards the top of my Baby Wipe stamp pad.
Place stamp of choice in Baby Wipe stamp pad (I used one of the Pocket Silhouette's) and stamp on center of Whisper White or Very Vanilla cardstock.
Have a wonderful day!

Supplies:
Cardstock: More Mustard, Very Vanilla, Early Espresso
DSP: Spice Cake
Ink: Early Espresso, Soft Suede ink pads; Reinkers - More Mustard, Old Olive, Soft Suede
Punches: Wide Oval, Word Window
Big Shot: Ovals #2 Bigz die, Framed Tulips and Designer Frames folders
Stamp Set: Pocket Silhouette, Teeny Tiny Wishes

Friday, October 21, 2011

Free Day of Gratitude Tutorial

My theme for this month's card class was Fall. The Spice Cake DSP made designing easy with its great color combinations and designs.
The first card I'm sharing is a hybrid, combining digital and card making. I used the MDS Autumn Kit digital download for the Day of Gratitude sentiment and the French Foliage leaf. I enlarged both the digital Day of Gratitude and French Foliage stamp, printing them out on Whisper White cardstock.The Spice Cake DSP background is also a digital printout. If you'd like to make this card for yourself, please Click Here for my FREE step-by-step tutorial, which includes the digital information for this card, along with instructions for putting the card together.
Thanks for dropping by and have fun!

Friday, September 23, 2011

Free Photo Holder Card Tutorial

The theme for my card class this month was Christmas Holder cards. We made a couple of newsletter holder cards and then this card, which is a Photo Holder, using the Top Note Bigz die which I wanted to share with you. Just click on the link Snowflake Photo Holder for your free PDF tutorial.
One of our stamping friends used Whisper White snowflakes instead of Bashful Blue and it made a beautiful card. What makes this card a little special, is that when the recipient pulls out the photo they still have a beautiful stamped Christmas card. When I first designed the card I had only stamped a sentiment, but it seemed to need a little bit more, so I added the trees from Plant Hope. (Thanks, Susan, for letting me borrow your stamp set...I'm ordering my own this month :-)
I'd love to see what you come up with, so please feel free to send me a photo of your rendition of the Photo Holder. I hope that you have fun trying the card out. Happy Friday!


Saturday, August 20, 2011

Scallop Circle Card


I hope that you're enjoying your Saturday. I'm hoping to squeeze in a little time to today to create some cards and projects for upcoming classes. I have a ton of ideas, now I just need the time :-) I made this little Scallop Circle card to pair with the Summer Basket I shared with you earlier this week. If you missed the FREE tutorial for the basket you can Click Here for the Basket post, which includes the links to the Basket Tutorial and Template. I'm also sharing the tutorial for the coordinating Scallop Circle card, just Click Here (lots of clicking, huh?). I hope you have fun!!

Have a great Saturday and weekend!!

Monday, August 15, 2011

Summer Basket Tutorial Share

I created this Summer Basket awhile back using the Paisley Petals DSP. I love this color...it's soft and looks great with Marina Mist. I gave this basket to a friend of mine filling it with a couple of Bath & Body Works lotions along with See's Candy suckers and a gift card. It made such a pretty way to give a gift. You could fill it with a set of cards, candy, whatever else you can think of that will fit inside the basket.
I'd love to share the tutorial for this basket with you. For your free PDF's, you'll need to click on both the Summer Basket Tutorial and the Basket Templates! I also made a Scallop Circle card to coordinate with it, which I'll share later this week. Until then, I hope that you have fun creating!
Also, if you're looking for a great designer paper deal, Stampin Up is offering a "Buy 3, Get 1 Free" deal through August.


See you next time :-)

Sunday, July 17, 2011

In-Color Workshop Card Tutorial

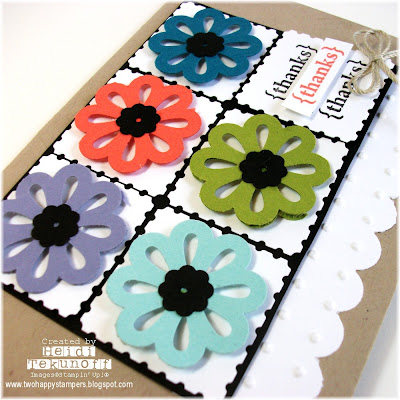
Today I'm hosting my annual New Catalog Workshop and this is the card we'll be making. We'll be using some of Stampin' Up's new catalog items: Blossom Bouquet Punch; Postage Stamp Punch; Pretty Postage Stamp Set; and the new In-Colors (Calypso Coral, Pool Party, Wisteria Wonder, Lucky Limeade, Island Indigo).

If you'd like to make this card, Just CLICK HERE for the free PDF step-by-step illustrated tutorial. I hope you have fun and thanks a bunch for stopping by!