Monday, January 14, 2013

Monthly Stampin' Up! Project Kits

Here's a fun and exciting new offer from Stampin' Up! The monthly kits will begin shipping in March, but you can sign-up NOW!


I'm Paper Pumpkin . . .
Beginning in March 2013, I will come to your door each month. I'll help you to escape your life with some paper fun.
I come in a sweet box, but you'll really love what you find on the inside:
All the stamps, ink, paper, and accessories to create projects, along with easy to follow instructions. Create stuff like cards, journals, décor, and more! Paper Pumpkin by Stampin' Up! is a new monthly kit program that anyone (even you) can enjoy!

Get Started

It's so easy to get started. Simply sign up for the program by visiting www.mypaperpumpkin.com and click "Get it". Every month a new, surprise project kit arrives at your doorstep. Just think of the anticipation of creating a fun project to pin, showoff, and share with your friends and family-every month!
Of course, you'll want to know more. So here's the nitty gritty:
  • Each month we send you a unique, surprise kit with a project-cards, journals, décor, and more! (We've even color-coordinated, measured, and cut everything for you!)
  • Each kit includes instructions, stamps, ink, paper, and accessories-everything but adhesive.
  • Each kit gives you a 30-minute creativity escape.
  • We will ship your Paper Pumpkin on or around the 15th of the month.  
  • You need to sign up for a kit by the 10th of the month to get that month's kit. If you sign up on the 11th of the month, your first kit will come the next month. (Let's say you sign up on May 10th, we'll send your kit around May 15th. If you sign up on May 11th, we'll send your first kit around June 15th.)
  • A Paper Pumpkin membership is $19.95 per month (and shipping is included!) 
  • There's no commitment, you can cancel your monthly Paper Pumpkin at anytime. You can also skip a month if you want.

Here's How You Order
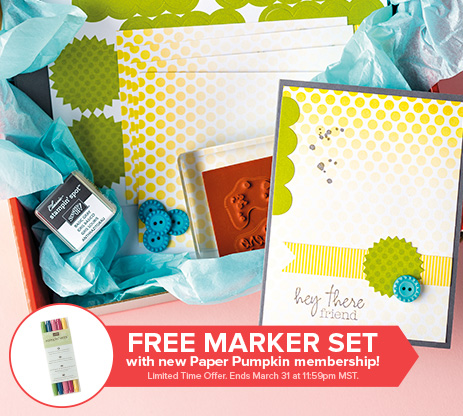
Sign up for your monthly Paper Pumpkin starting Monday, January 14 by visiting www.mypaperpumpkin.com and click Get it.


A Free Gift in Your Very First Kit

The Welcome Kit is the very first Paper Pumpkin you will receive in your first month of membership. The Welcome Kit includes a free gift-a clear acrylic block!

Saturday, January 12, 2013

A Doily More Amore Valentine

Is it already time to move onto the next holiday? I guess so. I spent several weeks in December creating, of all things, Valentine cards! I shared the first card a few days ago, and I'll be sharing the rest of the Valentine cards over the next several weeks. I have a Hearts A Plenty free tutorial (sorry, it's minus photo-by-photo directions) for a few of them, which you'll be able to find under my Free Tutorials.
This card share uses some items from the new 2013 Stampin Up mini catalog: That's the Ticket stamp set, paper doiley, and the cute designer paper More Amore.

To view the supply list and basic tutorial, click here.

Click to Order Stampin' Up! Supplies

Thursday, January 10, 2013

More Amore Heart Valentine

The More Amore DSP is such a fun Valentine-themed paper. I wanted a Valentine card that was less frilly and more on the fun side. The More Amore DSP and Chevron EB folder worked together well to create that fun. I used one of my Faux Metal buttons for the button accent, but the new Silver Designer Buttons from the Mini catalog would work great here. I have a Hearts A Plenty free tutorial (sorry, it's minus photo-by-photo directions) for this card, which you'll be able to find under my Free Tutorials.


                     To view the supply list and basic tutorial, click here.

                       Click to Order Stampin' Up! Supplies

Tuesday, January 8, 2013

Sweet Valentine Deals Available


January 3 through January 21, Stampin' Up! is offering two valentine deals! 
1) My Little Stamp Set Exclusive -  Get the Sealed with Love Simply Sent Kit FREE ($7.95 value, pictured below) when you purchase the brand-new My Little Valentine Set ($9.95). This four-piece set was created exclusively for this promotion and will not be available again after January 21!  No limit!Stampinup stampin pretty simply sent kit
 My Little Valentine Stamp Set stamp images shown below:

132242L
ItemDescription
132242My Little Valentine (clear-mount) - $9.95


2) Valentine Treat Bundle  This  bundle offer contains the brand-new Happy Valentine Heart Single Stamp (coordinates with the Stampin' Up! Full Heart Punch, NOT included in the bundle) and a package of 1" x 8" cellophane bags.  No limit on the number of bundles you can order!  The Happy Valentine Heart Single Stamp and bundle are ONLY available through Jan. 21. To get the bundle pricing, use item #132771.
132771L
Bundle Item
Description

132771Valentine Treat Bundle - 5.95
Includes the Happy Valentine Heart Single Stamp  (clear-mount) and 1" x 8" cellophane bags

Saturday, January 5, 2013

Fancy Fan Valentine

First off, since this is my first post of the year, I want to wish you all a very 
Happy New Year!
Now, onto stamping and Valentine's Day. I wanted to make a CAS Valentine card and this is what I came up with. I used the new Needlepoint Border EB folder from the new Mini catalog as my textured accent on the card front. For the heart, I used the Primrose Petals Core'dinations CS and the Fancy Fan EB folder, and lightly sanded the raised impressions to create the light and dark on the heart framelit. The You are Loved stamp set provided the sentiment and floral accent. I've posted the supply list below. Thanks for dropping by!

Supply List:
CS: Whisper White, Primrose Petals Core'dinations CS (129322), Real Red
Ink: Primrose Red, Early Espresso
SS: You are Loved (123779)
Big Shot: Fancy Fan EB folder (127751), Hearts Collection framelit (125599), Needlepoint Border EB folder (129383)
Accessories: Large Rhinestone Jewels (129324), Basic Jewels-Rhinestone

Wednesday, December 19, 2012

Rustic Best of Everything


Here's a card share that is not Christmas related. It's a special card I made for a friend who needed a pick-me-up. I used the great Woodgrain embossing folder on Crumb Cake and dragged my Early Espresso stamp pad over the raised embossed image, sponging the edges of the card, the So Saffron label, and DSP with the same ink. I used my Cherry Cobbler, Riding Hood Red, and Early Espresso markers to color and ink up the Best of Everything stamp set. The blender pen was great for blending the colors together. I cut out the tree and the stamped leaves, layering them for a 3-D look. Paper-piercing, twine and rhinestones helped to finish up the rustic feel of the card.
Thanks a bunch for dropping by!
Supplies
CS: Early Espresso, Crumb Cake, So Saffron, Very Vanilla
DSP: Comfort Cafe
Ink: Early Espresso, Cherry Cobbler, Riding Hood Red (ink and Stampin' Write markers
SS: Best of Everything, Itty Bitty Banners
Punches: 3/4" circle, 1/2" circle
Big Shot: Apothecary Accents (127003); Bitty Banners framelits (129267), Woodgrain embossing folder (127821)
Accessories:  jewels-rhinestone, linen thread, Paper Piercing Pack Essentials (126187), sponges

Saturday, December 15, 2012

Clearance Rack Blitz

I'm a day late in posting the great Clearance Rack Blitz going on right now at Stampin' Up! Over 300 new Clearance Rack items have been added to the Online Store at discounts up to 80 percent off retail-only while supplies last! And for the first time ever, stamps are included at up to 40% off.

  • Only online orders qualify for this promotion, but you can order both Clearance Rack and non-Clearance Rack items on the same order.
  • There is no minimum purchase required to participate in this special offer-go nuts!
  • Qualifying Clearance Rack orders are eligible for hostess benefits/Stampin' Rewards. Bonus!
  • Clearance Rack Blitz items are only available while supplies last-so don't wait! And sorry, but there are no refunds or exchanges on Clearance Rack items.
 If you'd like to window shop all the great deals, CLICK HERE.

Have a wonderful weekend!

Saturday, December 8, 2012

Advent Calendar Garland


     Here's an Advent Calendar Garland made with Dixie cups. I saw this cute idea on “My Craft Channel” and thought I’d try it out for myself. The only tip or instruction given was to take apart a Dixie cup to make your pattern. From there I was on my own.
     I had a bunch of the Festival of Prints DSP sheets left from my Club project, so I used these to glue over the Dixie cups. I punched a hole on each side of the cup where I attached a metal handle. I created my advent number embellishments using My Digital Studio. I basically got to create my own Advent Calendar Kit using the DSP and creating coordinating embellishments, which was kind of a fun thing to do. The embellishments were attached to the front of the cups with a dimensional. I tied ornament hooks to a string of yarn which the Advent cups hung from.

The cups can be filled with candy, little gifts or Scriptures for each day, as you work your way towards December 25th. It's fun and simple Advent Calendar project to make.
Hope that you're having a great December so far!

Saturday, December 1, 2012

December Newsletter is Posted

It's here, the final newsletter of the year. Can you believe it? To view December's newsletter CLICK HERE or on the Newsletter button on the right side of my blog. This month's newsletter includes the "Be Inspired" page with some great card shares from fellow stampers, pictures from 2012's Stamp Club Lunch and lots of Stampin' Up news and promotions for December.
Chocolate cupcakes from our Stamp Club lunch...yum, yum!
The December countdown begins...hope you have a great December!

Thursday, November 29, 2012

Hybrid Anniversary Card

Today I've veered away from Christmas to share this hybrid card I made several months ago. I  CASE'd this card from Connie Collins as my anniversary card for my husband. After a summer of no stamping due to my broken arm, her card got my creative juices going again.
This was actually a fun card to copy using My Digital Studio's digital stamps and Comfort Cafe designer paper. My "love" sentiment and flourish background are both digital stamps which I printed out on Crumb Cake card stock.
Supplies:
CS: Soft Suede, Crumb Cake, Comfort Cafe DSP
INK: MDS Early Espresso, Soft Suede for sponging

Thanks a bunch for stopping by! Hope that you have a wonderful day :-)


Friday, November 23, 2012

Three Gumball Green Trees

I love the Gumball Green as a Christmas color. The new Gumball Green stamp pad did a great job of inking up the solid stamp tree images for this card, which happens to be the last of the three cards we made in last month's Christmas trio class. I used the Pennant Parade stamp set for these cute trees along with the Pennant punch.
The cute Gumball Green polka dot paper strip is from the fun Be of Good Cheer DSP.

Happy Stamping!


Tuesday, November 20, 2012

Merry Gift Card Ornament

Today I'm sharing this fun ornament along with a FREE TUTORIAL, if you'd like to make them for yourself. I got the idea for these cute ornaments from another blogger, who got her idea from Martha Stewart. From there I thought that if they were redesigned, they would make great gift card holders that you could hang on your tree. I went ahead and remade them to hold a gift card, but they could be used as a money holder, or what we're actually going to be using them for...our "wishlists". We're using the gift card holder inserts to write our wishlists on and tucking them back into the Ornament. Each Ornament has the name of one member of the family which has their wishlist. It puts a fun little spin on Christmas this year.
I made simple embellishments for the ornaments using stamping and My Digital Studio, but they could be made up as extravagant and as fun as you like. All supplies, cutting and assembly information can be found in the tutorial.


I saw another really cute idea today for a 25 Days of Christmas garland. If I find time to make one up before December 1, I'll post it on my blog for you.
Have a Happy Thanksgiving!!

Monday, November 19, 2012

Online Extravanganza Begins


Here's what you've been waiting for...lots and lots of Stampin' Up stuff with discounts up to 50 percent and 24-hour-only doorbusters. You won't want to miss it!!

MONDAY'S exclusive 24-hour on sale items:

125586 Simply Scored™ Diagonal Plate $11.95 - now $9.56
113439 Big Shot™ Die-Cutting Machine $99.95  - now $79.96
113474 Big Shot Doctor’s Bag $69.95 - now $55.96

WEDNESDAY'S exclusive 24-hour on sale items:

118491 Clear Block Bundle (Blocks A-I) $66.95 - now $53.56
120279 Clear Block Storage Caddy $16.95 - now $13.56
109127 Stack & Store Caddy $34.95 - now $27.96


20% OFF ITEMS:

117155 Brights Designer Series Paper Stack $21.95 - now$17.56
164 126896 Be of Good Cheer Designer Series Paper $10.95 - now $8.76

Here's a few of the 50% OFF ITEMS:

123027 Fabulous Florets Stamp Set [c] $17.95 - now$8.98
130646 MDS 2+ (download) $79.95 - now$39.98
130644 MDS 2 (download) $39.95 - now$19.98
130650 
MDS 2 Upgrade 
(for those who already own My Digital Studio; 
download) 
$19.95 - now $9.98


Tons more items at 25%, 35%, 40% and 50% OFF
Click Here to view the complete PDF list of items on sale

Visit my Website to SHOP NOW!!

Thursday, November 15, 2012

Layered Christmas Noel

Layers, layers, layers! This card is one of the cards we made in my Christmas trio class, and it has lots of layers along with a gold embossed ornament, textured embossed Labels framelit and the rich Cherry Cobbler cardstock.
I used the Joyous Celebrations stamp set for the ornament, ribbon, holly and sentiment.

Happy Stamping!


Friday, November 2, 2012

Punched Poinsetta

My inspiration for this card came from Nancy Littrell's punched poinsetta. I used the Blossom Petals punch to create the three layers of the Cherry Cobbler poinsetta.
This was one of three cards we made in last month's Christmas Card Trio class. We all had plenty of sticky fingers after this card was finished, but the end result 
was well worth it.
Thanks for stopping by!


Thursday, November 1, 2012

November Stamping Newsletter

My November Stamping Newsletter has been posted. You can view it HERE or by clicking on the Newsletter link on the right side bar. I've got a bunch of this month's Stampin' Up! news and specials, with FREE digital downloads, 1/2-price digital downloads, Single Stamps offer and more. Plus I've included a fun Craftroom Tip inside the newsletter, which shows how I made this fun fall leaves. 

Monday, October 29, 2012

Sell-A-Stamp One-Day Sale


Today, October 29, for ONE day only, you will get 
15 percent off 
almost every stamp Stampin' Up! sells! 
  • Starting at 12:00 AM (MT) and ending at 11:50 PM (MT), almost every stamp will be 15 percent off.
This means all stamps in the current catalogs including:
Stippled Blossoms Clear-Mount Stamp SetPapillon Potpourri Clear-Mount Stamp SetPleasant Poppies Clear-Mount Stamp Set Sunflower Clear-Mount Stamp Set
    • Background stamps
    • Personalized name stamps
    • Incentive stamp sets from the supply list
    • Cookie press stamps
    • Single Stamps (Click on link to learn more)
Blooming with Kindness: Flower Clear-Mount StampBold Snowflake Clear-Mount StampChristmas Lodge: Tree Clear-Mount Stamp
Perfectly Penned: Celebrate Today Clear-Mount Stamp
This DOES NOT include
    • Hostess sets
    • Bundled stamp sets
    • Digital stamp brush sets
Click Here to visit
 my website to learn more and to order!!!

Friday, October 19, 2012

Sympathy Card CASE

Today I'm sharing a sympathy card I CASE'd from Mary Fish. I loved her color combination and her clean and simple layout.

I changed out a few details using Just Believe and Petite Pairs (one of my favorites) stamp sets. I used the Fancy Fan embossing folder to emboss the card front, and a navy Sharpie marker to color my rhinestones.
I've posted the supply list below:

Supplies
CS: Crumb Cake, Very Vanilla
Ink: Crumb Cake, Midnight Muse
SS: Just Believe, Petite Pairs
Punches: Corner Roundher
Big Shot: Large Scallop Edgelits die (127019), Delicate Designs embossing folder(127023), Fancy Fan embossing folder (127751)
Accessories:  jewels-rhinestone, Midnight Muse 3/8" stitched satin ribbon (126847(

Thursday, October 4, 2012

Mixed Bunch Smooches Card and Tutorial

I'm excited to share this fun card with you because I also have a FREE tutorial to go with it. We made this card in my September card class. It uses the Rock-n-Roll stamping technique to get the darker color around the edges of the flower petals of the cute stamp set Mixed Bunch.
CLICK HERE to access the free tutorial.
Have fun creating!


Monday, October 1, 2012

October Stamping Newsletter

My October Stamping Newsletter has been posted. You can view it HERE or by clicking on the Newsletter link on the right side bar. This month I'll be offering my Christmas Card Trio Class featuring a punched Poinsetta, heat and dry embossing and some cute stamped and punched Christmas trees. My class times are posted below, as well as in the newsletter, along with more class information, Stampin' Up's special for the month, and a bunch of great cards submitted on the Be Inspired page by your fellow stampers. 


October Classes
Creative Cards: Christmas Trio Cards ($15)
Tuesday, 10/16 – 10 AM-Noon; 7-9 PM at Tumbleweed Recreation Center
Tuesday, 10/23 – 10 AM-Noon; 1:30-3:30 PM; 7-9 PM at Heidi’s House


My Christmas Card Trio Class tutorial will also be available
for purchase later this month.

I used the Perfectly Preserved stamp set to create this month's thank you tags for my customers. I used MDS to create the digital stamped jar so I could quickly add a little digital flower inside it, but you could easily punch a flower to add to the jar. I also used the coordinating Cannery framelit, Be of Good Cheer DSP and Woodgrain embossing folder . I've posted the supply list below:

Supplies
CS: Crumb Cake, Cherry Cobbler, Whisper White, Be of Good Cheer DSP (126896)
Ink: Basic Black, Old Olive, Daffodil Delight, Soft Suede
SS: Perfectly Preserved(129944), Digital "thank you"
Punches: 2-1/2" Circle
Big Shot: Bitty Banners Framelits, Woodgrain embossing folder(127821), Cannery framelit (129944)
Accessories:  jewels-rhinestone

Thursday, September 27, 2012

Bold Bright Birthday


This fun card was inspired by a card I saw on another stamp set company's blog. The Mixed Bunch stamp set is has several great floral images. This image worked great with the bright yellow Summer Smooches DSP. I loved the bold black border on the card I cased and used it to set off the bright yellow flower.
Thanks for stopping by:-)

Thursday, September 20, 2012

Preserved Thank You

Hi Stamping and Blogging friends. Todays post is a thank you card I made using the cute Perfectly Preserved stamp set. The new Woodgrain embossing folder is a fun background for the cute Mason jar. I used the digital version of the stamp set so that I could re-size and create the little yellow flower to be printed inside the jar, but used the coordinating Cannery Set framelits to cut out the jar and lid.

This stamp set is perfect for the coming Fall season...for thank you's, Thanksgiving cards, and Fall birthdays.
Have a wonderful day!

Supplies
CS: Crumb Cake, Early Espresso, Cherry Cobbler, Very Vanilla, Early Espresso
Ink: Early Espresso, Old Olive, Daffodil Delight, Soft Suede
SS: Perfectly Preserved, Digital "thank you"
Punches: Corner Rounder, 2-1/2" Circle
Big Shot: Bitty Banners Framelits, Woodgrain embossing folder, Finishing Touches edgelit (zig-zag edge)
Accessories: baker's twine, sponge dauber, jewels-rhinestone


Saturday, September 1, 2012

September Stamping Newsletter

My September Stamping Newsletter has been posted. You can view it HERE or by clicking on the Newsletter link on the right side bar. This month I'll be offering my previously cancelled U-Stamp Class this month, more information in the newsletter, along with lots of cards and projects submitted on the Be Inspired page by your fellow stampers.  

If you'd like to view the 2012 Holiday Mini Catalog online, CLICK HERE.