Saturday, September 27, 2008

Paper Piecing Part 2


From Adriel:

A couple of weeks ago, I showed you all a card I made using the paper piecing technique. Here's another one for you...


I wasn't crazy about how this one turned out, so I made another one...


I'm drawing a blank on the name of this set... errrr. It's retired, but still, I should remember things like this better! Okay, I looked on SCS and found the name... Sparkling Summer. Cute set! I stamped the images first on the white CS and colored them in. I stamped the images again on white CS and used sponging to color in some of the images and then followed with Stampin' Write markers. I cut out the images and used dimensionals to attach over the existing image. It's a fun technique! I had a lot of fun with this card. This is in preparation for our technique classes at Tumbleweek Rec. Center this coming winter.

We are getting ready for a lot of different things right now! Next month, we will be hosting our Christmas Card Stamp-a-Stacks... we've got several of you coming to those and we are looking forward to that! Hamilton Library also asked us to do an accordion album with the teens next month. We also will be doing two craft shows in November. We'll let you know about the dates and times of those shows later. Anyway, we are two busy bees! Our stash of crafted items is growing by the day (almost) and we are working hard! I hope we will see some of your familiar faces at these events coming up! Stamping and papercrafting are great ways to make friends! Thanks for looking and have a wonderful weekend!

Wednesday, September 24, 2008

Craft Items


We found a couple of local craft fairs to participate in this coming November, so we've been working on some fun paper items. We'll hopefully be able to post pictures of our items throughout the next few weeks. I'll start with these cute cookbook bookmarks. These are so cute and fun to make! They're great to use when you need to make notes on or changes to a recipe, or to mark pages of your favorite recipes. I wish that I'd had these ready to go a few evenings ago when I was making dinner. I was changing ingredients in the recipe and writing them into the cookbook, it would've been nice to have these cookbook bookmarks to write on instead.

Monday, September 22, 2008

Holiday Mini Catalogs Available


The new Holiday Mini catalog is now available. Some of you may have received one already in the mail. If you haven’t received one, but would like one, simply email me heiditek@cox.net with your mailing address, and we will send one out to you ASAP. You’ll find a variety of styles, images and looks – from stamp sets and Designer Series paper to ornament and calendar kits, holiday décor, and Felt Flurries. Plus it’s filled with project ideas for many of the festive days during this time of year.

Thursday, September 18, 2008

Cute Nugget Box and Cute Frame (and a Cute Kid)!

From Adriel:

LOL! That cute kid is my brother... like 4 or 5 years ago!!! Haha! He is going to appreciate my title very, very much!

Today I worked on October's newsletter. We should be getting it out to those of you who are signed up to receive our newsletter within the next couple of days. I had it almost completely finished this evening and hit the save button and this box pops on the screen that says "We're sorry, Microsoft has encountered an error and has to close the program." NOOOOO!!!! Fortunately for me, I have a genius computer guy for a husband and he was able to restore the file and get it back! Thanks, Gary!!! So, I didn't end up having to spend the rest of the night redoing all that work! I'm so thankful!
Here's a little something to share with you. A chocolate nugget box and chipboard frame! I made these in preparation for our Christmas Treasures class through Chandler Parks & Rec. For those of you who haven't heard, beginning in December, our classes will be held at Tumbleweed Rec. Center in Chandler! We are very excited about this! My mom is also going to be doing classes at the Senior Center downtown.

This nugget box was pretty simple to make. There's a gal on SCS that posted a gob of different files with different dimensions for different sized boxes that fit different numbers of nuggets with different... you get the point! Anyway, the link to get to the thread all about the nugget boxes is HERE. It's crazy! There are no directions, but if you are familiar with basic box-making, it's fairly easy to figure out. I got stuck at one point and had to take my box apart and fold it differently, but I think that was more of a blonde moment (my SCS user name is blondestamper) and not because the project was difficult! I used Chocolate Chip CS for the basic box and the all-new Autumn Vine DS paper from Stampin' Up! I used the Best Friends alphabet set for the letters on the nuggets. Love the results!

The frame is from Stampin' Up! and is a chipboard frame. I just covered it with Autumn Vine DS paper and sanded the edges. I put a piece of CS behind, leaving a space for a picture to be inserted. Added the bling in the corners. I will be putting a magnet on the back of this (it is supposed to be a magnetic picture frame).

Hope you enjoyed looking today! I know Christmas is a little ways away, but we are having to get all this stuff ready for our classes. Hope some of you can join us! Thanks for looking!

Monday, September 15, 2008

Christmas Stamp-a-Stack

From Adriel:
Wow, we haven't put a new post on here for a few days! That doesn't mean we haven't been busy! We've been working on lots of projects, too many to show you today. We are doing 4 10 for $10 Christmas card Stamp-a-Stacks in October. Here's a sneak peek at some of the cards we've been working on for this event!


Looks fun, huh? Wanna come? We've still got openings for some of the dates. Just email us to sign up! See below for available dates for the Christmas Stamp-a-Stack:
Oct. 8, 1-3:30pm: 4 more openings
Oct. 10, 7-9:30pm: 6 more openings
Oct. 22, 1-3:30pm: FULL
Oct. 24, 7-9:30pm: 6 more openings
Have a wonderful day!

Tuesday, September 9, 2008

24/7 Online Ordering Now Available!!!


You did indeed read the title correctly! Stampin' Up! is now offering 24/7 online ordering for our valuable customers! You don't have to call your demonstrator or email them... you can just go online and order on your own, at a time convenient for you and have it shipped to your home! How convenient is that? To order, simply click here or visit http://www.heidiscorner.stampinup.net/ which will take you to Heidi's Stampin' Up! Demonstrator website. Under the contact information at the top right-hand corner of the page, there is a "SHOP NOW" button. This will take you to the online store where you can put items in your shopping cart and checkout! More information about online ordering can be found HERE! If you have any questions, feel free to contact us. Try it out and let us know how you like the new online ordering!

OSW Verve Challenge

From Adriel:


Here's the cards I made for the OSW (One Sheet Wonder) Verve Release Challenge on SCS. I got out my sewing machine for this challenge and had a great time. I used Cutie Pie (retired) DS paper from Stampin' Up!, a lot of sticky rhinestones, lots of layers and lots of punches! Last week I discovered that I can use my scallop circle punch to make cute scallop photo corners, so I am currently hooked on those, which you can see in the photos! Let me know what you think!
On another note, yesterday I also worked on the card kit that we will be offering for the month of October. More details about that within the next few days.
Also, if you would like to receive our e-newsletter, let us know by email!
One of the verses I read this morning: "For the ways of the Lord are right, and the righteous will walk in them, but transgressors will stumble in them." Hosea 14:9

Sunday, September 7, 2008

Fun with Sponging

From Heidi...


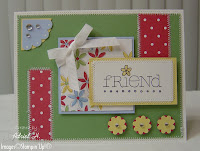
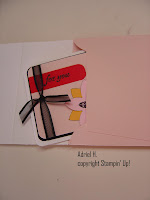
Adriel and I have been busy creating cards and projects for our upcoming classes to be held at Tumbleweed Park/Rec center this winter, so last week I came up with a few cards that we will be making using sponging. I used the layout for the pink circle card with one I saw on the Stampin'Up showcase, but added black to the card. This was a simple and quick card to make. The burgundy card is my design. I love the simple flowers from this stamp set "Embrace Life". I embossed the flower with winter wonderland embossing powder. It has little flecks of glitter, which gives it a bit of a bling. I used Bravo Burgundy, Mostly Mustard and So Saffron to sponge around the embossed flowers, the papers used are B.Burgundy, Sahara Sand, Pink Pirouette (edges sponged with B.Burgundy), and So Saffron. All the family members gave it two thumbs up.
I'm also adding a picture of our new supply organizer my husband built for me. He made a place for punches, ribbon and other supplies. I think he did a great job and I really appreciate it...and him!

Saturday, September 6, 2008

Time to Vote!

From Adriel:

Head over the Theresa Forseth's blog to vote for your favorite entry for her Handbag Challenge #5. Click here to view the other entries and leave a comment for your favorite! Here's a picture of the handbag for the inspiration and also a picture of what I made! Thanks for looking! Have a wonderful weekend!


Friday, September 5, 2008

Handbag Challenge #5


From Adriel:

It's Friday again and that means the deadline for Handbag Challenge #5 on Theresa Forseth's blog is fast approaching. My entry this week is 4 little 3x3 cards and special "bag" to hold them in. I found a wonderful tutorial for an envelope book here. I used the same concept and designed my own "envelope" that would hold 3x3 cards and envies. I decorated the front of the card holder to match the purse as best I could. The colors I used for this "handbag" were Blush Blossom, Pink Piroutte, Summer Sun, Real Red, Whisper White, and Basic Black (SU! colors).

The bag opens to hold 4 matching 3x3 cards and envelopes. You can see how it opens below.


I tried a new technique with this project... faux metal. The silver accent on the front of the bag is actually 3 layers of silver embossing powder imprinted with a stamp. So cool! I was stumped on the zipper, so I consulted my mom (who sews very well BTW). She got out a zipper and rubbed ink on it and rubbed that on paper. It seemed promising, so we rubbed Versamark on the zipper, rubbed on the CS, then applied the silver embossing powder which was then heat embossed. It worked great!


The card is a 3x3 card with the same colors used on the purse. I used the Fresh Cuts set for the saying and and the flower in the middle of the flower. I used my 5-petal punch for the embellishment and some nice, sheer, black ribbon. It would make a cute gift for someone, I think.


The bag was the most difficult part of the project. It took a lot of planning and working, along with re-working. I've been working on it a little here and a lot there over the past 3 days! It was worth it and I enjoyed what I learned. It really looks so much nicer in person, but I've posted several pictures to give you some good views. Thanks for looking and enjoy your weekend! Don't forget to go to Theresa's blog on Saturday and Sunday to vote for your favorite entry!

Thursday, September 4, 2008

Combination of Challenges Pt. 2

From Adriel:

UPDATE: I'm a dummie and I forgot I'm not on Mountain time, I'm on Pacific time. Living in Arizona can be confusing at times. In the spring and summer, we are on Pacific time. In the fall and winter, we are on Mountain time. Why they decided to do this us, I don't know, but it's very confusing! Anyway... why am I sharing this information? Yes, there is a point besides what I just shared! hehe Well, one of the challenges that this card was for (kwerner's) ended at 7pm Mountain time. I posted my card 6:40 my time... yes, that's right, Pacific time. Argh! I thought I had gotten in on time, but NO! Alas! I was late, because in reality I am one hour behind what I thought I was! Wah! Anyway, the colors worked great for this challenge, regardless, and it will still make a great entry for the Mojo#51 sketch challenge.

Here's some details about the card:

The colors for this card are all Stampin' Up! - Pacific Point, Kiwi Kiss, Regal Rose, Rose Red and Whisper White. Again, these were the colors for the inspiration challenge on Kristina Werner's blog... painful reminder. Let's move on...

I used the Mojo#52 sketch challenge on the Poetic Artistry blog. I've never participated before in this challenge, so this is my first time. I really enjoyed myself!

I decided first of all to use the Pacific Point for the main card base. I inked the edges of the card base with white craft ink. It's not very noticeable, but it's there. I used the Rose Red for the top scalloped panel. The white grosgrain ribbon was just the best fit for this card. I know it's incredibly basic, but it fit the best out of all the ribbon I had to choose from. The patterned background is just stamped Whisper White CS. I wanted to use something patterned, not just blank, but I didn't have any printed paper with these colors. I used the Little Pieces set from SU! and stamped them on the Whisper White CS. I then sponged Pacific Point on the edges of the strip before attaching it to the card base. The Rose Red scalloped panel was then attached to the top.

I played around the most with the sentiment and panel that went behind it. First I started out with a white panel, stamped with a different flower and different sentiment, with was attached to a slightly larger Regal Rose panel, then dimensioned on top of a crimped panel of Kiwi Kiss. No, it just didn't look right. I then went with the Kiwi Kiss panel for the sentiment and tried some different things with that. This is the one I liked the most. I used the medium flower from the Doodle This set from SU! and stamped with Pacific Point. I let some of the image go off the edges... I think it looked better that way. The sentiment is from the Fundamental Phrases set from SU! and was stamped in white craft ink. I then inked the edges of the Kiwi Kiss panel with white craft ink to make the panel a little more interesting. I punched some smaller-sized photo corners in Whisper White and attached them to just two of the corners on the Kiwi Kiss sentiment panel. They're just peeking out every so slightly, but just enough. My mom gave her input about this and she suggested just a slight amount showing. She has a good eye! The Kiwi Kiss sentiment panel was then dimensioned onto the crimped Regal Rose panel. I think the crimping just added more personality to the card. I'm happy with how that turned out! The Regal Rose panel was then dimensioned onto the card itself! Now onto the embellishments...


I had the idea of using a quarter of the scallop circle punch to make a cute corner doo-dad thingy. I liked how they looked in the corners of the card, but the Kiwi Kiss didn't POP like I wanted it to, so I thought about putting the small punched photo corners behind them. (My mom gave me input with these photo corners, too! She's great, huh?) That worked so well! Added some sticky rhinestones and I was happy with them. Used the Boho Blossoms punch (SU!) for the flowers on the Kiwi Kiss sentiment panel along with a dimensional behind it to pop it off the panel and a sticky rhinestone to add the "bling" and the card was done!

And I'm sure you're glad I'm done telling you about it! Gee, I didn't realize there were so many steps to this card, but it did take awhile. Well, that's it. Thanks for looking and leave me a comment letting me know what you think!

P.S. Sorry there's a two of the same photo on this post. I tried to delete the picture and blogger won't let me without deleting the whole entire post! Things are going so smoothly tonight! =P

Combination of challenges!


From Adriel:

I'm just posting this real fast without too many details because I'm pressed for time. This card is for two separate challenges... I decided to combine them into one card. The two challenges are: Mojo #51 at Poetic Artistry and Kristina Werner's Inspiration Challenge #21. Lots of work but lots of fun! If I have time later on this evening, I'll post more details about card! Thanks for looking! Let me know what you think!

Wednesday, September 3, 2008

My First Swap Card

From Adriel:

Hey there! Last month I joined my first swap! For those of you who are wondering what a swap is, it is exactly that! A swap! As far as details go, it is basically you making a certain number of the same thing and then swapping with that same number of people to get that same number of different things back. The swap I joined on SCS was an all occassion SU! card swap, 5+1. This means I made a total of 6 of the same card. The +1 is for the person who hosted this swap. I send her all the cards I made, she disperses all the other swaps she receives to those who participated and keeps one for herself from each participant. So after I send my cards to her and she receives them, she will send me back 5 different cards. I won't receive one of mine back. Pretty fun! I hope I explained that so that it was understandable. Anyway, this "swap" idea is good for anything. People on SCS swap all kinds of things. Card fronts, card candy, ribbon, paper, embellishments, boxes, scrapbook pages, etc. All kinds of things! So, I had never done a swap before and thought, "Why not?!" So I joined and below is my card, which I made 6 of. The due date for these is not until the end of October, but I really should send these soon. I just haven't made it to the post office. Too many other things to do (like making more cards and creative projects)! Without further ado, here is the card I made...


The colors I used for this card were: Sahara Sand CS, Pink Piroutte, So Saffron, Bravo Burgundy, & Very Vanilla. I got this color combination idea from the Stampin' Up! catalog from the DS paper, Parisian Summer. I don't have the paper, but LOVE the colors.

I used the Sprinkles set with versamark and clear embossing powder for the background on the Pink Piroutte. Used the new scallop edge punch A LOT on this card, as you can see. The sentiment is from the All Holidays set and stamped in Bravo Burgundy ink. Attached the a Very Vanilla square and attached to card with dimensionals. I used the Boho Blossoms punch for the flowers and added pearl stickers (purchased at Michael's) to the middle of each of the flowers. That just added such a touch of elegance! Love those pearls! Finally, the satin cream ribbon is also from Michael's (a spool of it was $1!), and I made a bow with it. The only thing I don't like about that ribbon is it frays so easily, as you can see in the pic. I'll trim that before I send these off. If you have a tip to keep the satin ribbon from fraying, please share!

Anyway, that's the card! Let me know what you think! Being my first swap, I'm hoping it is up to par with what others do for this swap. Thanks for looking!

Tuesday, September 2, 2008

A Fun Party Favor!

From Adriel:
Hi there! I hope you all enjoyed your long weekend. We enjoyed ours with our family and friends. We got the ping-pong table out and had some fun with that. My dad spend this weekend building a wall craft storage thingy in the craft room at my parents' house. It looks so nice! I will have to put a picture of what he did on here when I get a chance. He did a great job and it will make the creating process so much easier with everything nicely organized and at our fingertips. So a BIG thank you to my dad!


Onto the subject of my post... a fun party favor! These little things are apparently called "Sour Cream Containers". Click here for the tutorial on SCS. I've wanted to try this out for awhile and had some time last week. These were fairly simple and quick to make. My kids wanted to make one, too, so I helped them put theirs together and they decorated them afterwards. Jacob gave his to Daddy and it got opened and thrown away before we got a picture. Here's mine and Kayla's. Kayla did a cute job decorating hers. Anyway, it was a fun project and one that the kids enjoyed making also.


All this is in preparation for the classes we will doing at Tumbleweed Rec Center during the winter through Parks & Rec for Chandler. We'll be doing a party favor class where we will be teaching participants how to make all kinds of different party favors. It should be a lot of fun!

Thanks for stopping by and looking! Have a great day!